 Table of Contents
  Previous Chapter 3 Editing MSC Diagrams
The MSC Editor is the tool with which you create the Message Sequence Charts, and edit the graphical and textual contents of these MSCs.
The MSC Editor provides several windows where you can see the contents of your diagrams.
This chapter describes how to work with the MSC Editor.
For a reference manual, see chapter 25, The MSC Editor.
The Message Sequence Chart Editor is the graphical tool that you use to create, edit, print and store MSCs. The Message Sequence Chart Editor is integrated with the SDL tools which are included in SDT. This integration provides, among other things, the facility of including MSCs into SDL systems.
Previous Chapter 3 Editing MSC Diagrams
The MSC Editor is the tool with which you create the Message Sequence Charts, and edit the graphical and textual contents of these MSCs.
The MSC Editor provides several windows where you can see the contents of your diagrams.
This chapter describes how to work with the MSC Editor.
For a reference manual, see chapter 25, The MSC Editor.
The Message Sequence Chart Editor is the graphical tool that you use to create, edit, print and store MSCs. The Message Sequence Chart Editor is integrated with the SDL tools which are included in SDT. This integration provides, among other things, the facility of including MSCs into SDL systems.
The basic editing functionality that the MSCE provides can be summarized as:
- Creating and managing MSCs
- Appending, moving, resizing symbols
- Interconnecting symbols with lines
- Editing text
- Printing MSCs.
The Message Sequence Chart Editor can also used as a graphical trace tool, which enables the automatic generation of a Message Sequence Chart from a simulation. The results of the simulation will be presented in an MSC Editor window, in which each event of interest will be appended to the chart in order to build up a chart which reflects the history of the simulation. The results of a simulation can be saved in MSC-PR form and reread by the MSC Editor.
The commands that start up the logging of MSC events, set up the scope of trace, stop the logging of events, and so on, are given to the simulator. See chapter 7, Simulating a System.
An MSC can be used as a means to express the requirements on an SDL system. With the MSC Editor and the Validator, SDT provides a powerful validation environment. The basic idea is to draw a Message Sequence Chart using the MSC Editor and then use the Validator to check if there is a possible execution path for the SDL system that satisfies the MSC.
The commands that validate a system are given to the validator. See chapter 8, Validating a System.
The MSC Editor supports virtually all of the ITU language definition for MSCs. All the elements defined in the recommendation Z.120 are supported.
Some extensions have been included in order to provide a tool that is even more powerful when used in the SDT environment, allowing to express a graphical trace in a more intuitive way:
MSCs cannot be split into multiple pages in the same way as SDL diagrams. However, if your MSC requires more than one sheet of paper when printing it out, the MSC Editor takes care of splitting the chart into multiple parts to print on separate sheets of the paper size you have specified. You set up the printer pages with The Preference Manager. You can use the Window Options menu choice from the View menu to show the page boundaries on the screen.
Each part of a multiple-part chart can be printed with adjacent page markers to assist you in making up the complete chart. This feature (which is not supported by the ITU Z.120 recommendation) is by default disabled and must be set as a preference.
Some of the MSC syntax rules are enforced during edit when you append symbols and lines to your MSC. These rules determine:
- Which symbols and lines are allowed to be interconnected
- Where symbols can be placed.
This syntax checking cannot be disabled. No syntax checking on text attributes takes place.
Before you can start the Message Sequence Chart Editor, you must start the SDT Organizer. (See chapter 22, The SDT Organizer.) In the Organizer, MSCs are handled as references, which you can add and remove from the Organizer Associated Documents Area.
There are a number of ways of starting the MSC Editor:
In this topic, various ways of starting the MSC Editor on existing MSCs are described.
To start the MSC Editor on an existing MSC which is managed by the Organizer, perform the following steps:
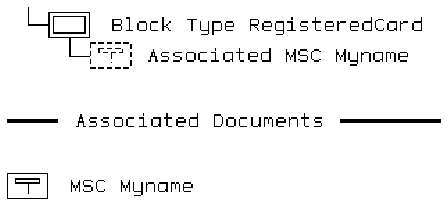
- In the Organizer Associated Documents Area, locate the icon that represents the MSC of your choice. Select that icon.
- To start the MSCE, you have the following options:
- With the Edit Diagram menu choice on the Organizer's Edit menu.
- With the Edit Diagram menu choice on the Organizer's Popup Menus.
- By double-clicking the MSC icon.
- After a few seconds, the MSCE responds by issuing its window (see "The MSC Editor Window" on page 1301 in chapter 25, The MSC Editor), then the current MSC data is read from file and the viewport will be positioned at the upper left portion of the chart.
To start the MSC Editor on an existing diagram that is not managed by the Organizer (i.e. not contained in the Organizer Associated Documents Area) you must first include it into the Organizer, before the MSC Editor can be started.
To include an existing MSC into the Organizer:
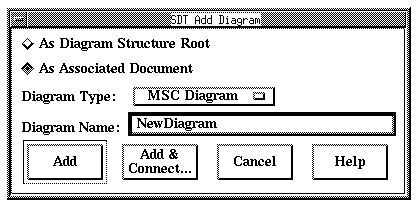
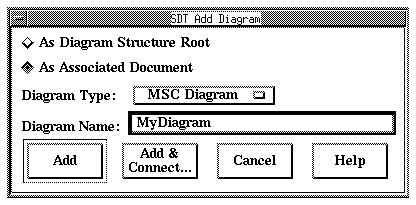
- Select the Organizer's Add Diagram command from the Edit menu. A dialog is issued:
Figure 76 : Adding an MSC
-----
(fig)

-----
- Make sure the diagram type is set to MSC. If not, select MSC from the Diagram Type option menu.
- Type in the name of the MSC in the Diagram Name field. (You need of course to know the name of the MSC that you want to add).
- Make sure the As Associated Document radio button is on.
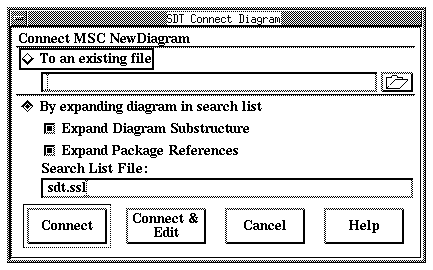
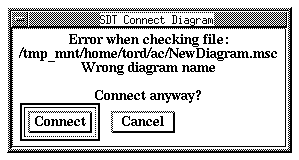
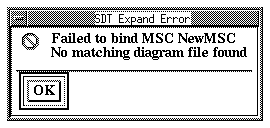
- Click the Add & Connect button. An SDT Connect Diagram is issued, prompting you to connect the MSC reference to a file on which the MSC is stored.
Figure 77 : Connecting the MSC to a File.
-----
(fig)

-----
You have the following options:
- If the checks passed without errors, the MSC is added to the Organizer's Associated Documents Area, the MSC Editor is started and displays the upper left corner of the MSC.
This operation denotes how to start the MSC Editor when no MSCs are available.
You should perform the following steps:
- Add a reference to an MSC using the Organizer's Add Diagram menu choice.
Figure 80 : Adding an MSC.
-----
(fig)

-----
- Make sure the diagram type is set to MSC. If not, select MSC from the Diagram Type option menu).
- We recommend that you already now assign the MSC reference its correct name in the Diagram Name field.
- Make sure the As Associated Document radio button is on (MSCs cannot be added as roots into the Diagram Structure Area).
- Click the Add button in the Add Diagram dialog. A new MSC Icon appears in the Associated Documents Area in the Organizer. The MSC has the status [unconnected], the connection will be established when saving the MSC (see "Saving a Newly Created MSC" on page 170).
Figure 81 : Having Added a Reference to a Non-Existing MSC.
-----
(fig)

-----
- Operate the Edit Diagram menu choice from the Organizer's Edit menu (see step 2. on page 160).
- Alternatively, activate the Organizer's Popup Menus or double-click the MSC Icon.
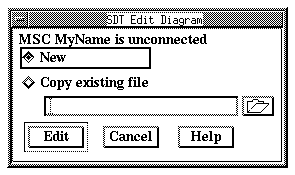
- Make sure the New radio button is on (see Figure 82). Click the New button.
Figure 82 : Editing a nonexisting MSC
-----
(fig)

-----
- This terminates the operation. The MSC Editor issues its window, displaying an empty diagram with the name assigned in the Organizer. The MSC icon changes its status from [unconnected] to [unsaved].
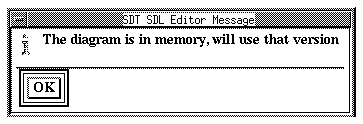
Figure 83 : The MSC Edit has Opened the MSC - Status Unsaved.
-----
(fig)

-----
To exit the MSC Editor:
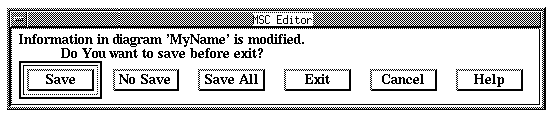
- Select the Exit command from the File menu. If the MSC Editor holds any MSC that has been modified but not saved, a dialog is issued, prompting you to save the changes before the application terminates:
Figure 84 : The MSC Editor Exit Dialog.
-----
(fig)

-----
- The dialog informs you about the name of the diagram in turn to be saved. Depending on what if you want to save the changes or not:
- Click Save to save any changes made to the current diagram. Once the diagram is saved, the MSC Editor will prompt you to save the next modified diagram, alternatively exit if there are no more diagrams to saved. If a diagram has never been saved on file, the tool will prompt you to specify a file (see "Saving a Newly Created MSC" on page 170).
- Click Save All to save all changes made to all diagrams. Once all diagrams are saved, the MSC Editor will exit. If a diagram that the MSC Editor holds has not yet been assigned a name, the tool will prompt you to assign a file before saving it.
- Click No Save to close the current diagram without saving it. The MSC Editor will then prompt you to save the next modified diagram, alternatively exit if there are no more diagrams to saved.
- Click Exit, No Save to exit the MSC Editor without saving any MSCs.
- Click Cancel if you want to change your mind and continue the MSC Editor session.
MSCs are created using the MSC Editor. Once a MSC has been created, you may include it into the structure that is managed by the Organizer tool in order to take full advantage of the functionality that SDT provides. MSCs can however be handled as separate entities.
In this section you can read about how to perform the following operations with SDT:
Below are described the two ways to create MSCs:
- One way is to create them from the MSC Editor, in which case the MSC is saved as a separate entity that is not automatically appended to the Organizer's Associated Documents Area.
- The other way is to start by adding a reference into the Organizer Associated Documents Area.
To create an MSC from the MSC Editor:
- Select the New command from the File menu. The MSC Editor creates a new MSC with the default name Diagram_1, Diagram_2,... Diagram_N. The new diagram's window is immediately displayed.
The procedure is identical to Starting on an Existing MSC, not Managed by the Organizer, previously described on page 160.
This action denotes changing the name and possibly the type of an MSC. The name and type of an MSC is reflected in the MSC Heading Symbol.
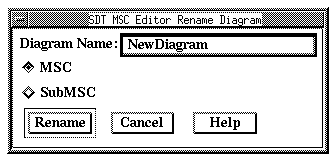
To change the name of an MSC:
- Make sure the MSC being displayed in the MSC Editor window is the MSC you want to rename.
- Select the Rename command from the Edit menu. A dialog is issued.
Figure 85 : Renaming an MSC.
-----
(fig)

-----
- Type in the new name of the MSC into the Diagram Name field.
- Toggle the appropriate radio button to the type of MSC you want to apply.
- Click the Rename button to apply the new name and type. The MSC is renamed accordingly and the MSC Heading Symbol is updated.
Opening an MSC is possible from the MSC Editor or from the Organizer.
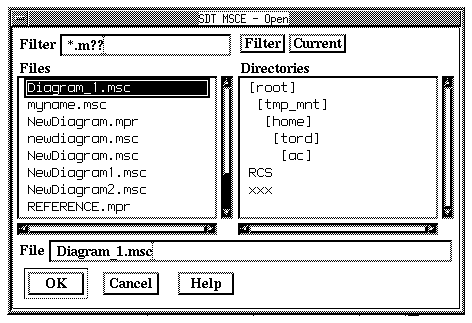
To open an MSC file from the MSC Editor:
- Select the Open command from the File menu.
---------------------------------------------------------
(fig)
- Alternatively, click the quick button for Open.
---------------------------------------------------------
The menu choice issues a Standard File Selection Dialog (see Figure 86) The general properties of the file selection dialog are described in chapter 21, The SDT Graphical User Interface.
Figure 86 : Opening a File from the MSC Editor.
-----
(fig)

-----
To select a file to open:
The filter field is set to *.m?? by default. This matches the default file extensions that we recommend for MSCs. However, SDT does not force you to use these default file extensions.
- If you have used other file extensions than the default, you should apply another suitable file filter and click the Filter button to bring these files into view. For a reference about default file extensions used by the Message Sequence Chart Editor, see the table in chapter 25, The MSC Editor, on page 1314.
To open an MSC-PR file (a file containing an MSC stored using the Z.120 textual format), you should filter using the *.mpr file extension.
----------------------------------------------------------------
Note:  SDT and instance orient MSC-PR
Only event-oriented MSC-PR can be read by the tool. Instance ori
ented MSC-PR cannot be read by the tool.
----------------------------------------------------------------
To open an MSC from the Organizer:
- In the Organizer Associated Documents Area, locate the icon that represents the MSC of your choice. Select that icon.
- Alternatively, if the MSC is associated with an SDL diagram, you can select the associated MSC link icon (looking like an MSC icon displayed in dashed form, see Figure 75 on page 159).
- To open the MSC, you have the following options:
- With the Edit Diagram menu choice on the Organizer's Edit menu.
- With the Edit Diagram menu choice on the Organizer's Popup Menus.
- By double-clicking the MSC icon.
There are several ways to save an MSC. The effect is of saving any changes made to either one specific MSC, or all MSCs modified during the current session.
Saving an MSC can also be performed in conjunction to closing the diagram or exiting the MSC Editor. See "Closing an MSC" on page 175 and "Exiting the MSC Editor" on page 164.
In the MSC Editor, a request to save should be made from the window showing the MSC to be saved (see "Transferring to an MSC" on page 176 for how to access and show a specific MSC) that is read by the MSC Editor.
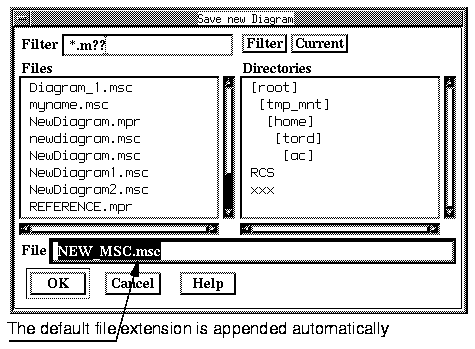
To save an MSC:
When an MSC that is not connected to any file (i.e. a newly created MSC) is to be saved, you need to specify a file to store the diagram on.
To save a newly created MSC:
- Select the Save command from the File menu. A Standard File Selection Dialog is issued (see Figure 88).
- Specify the file to save the diagram on.
- The default file name that the MSC Editor suggests consists of <diagramname> appended with a default file extension (see the table on page 1314 in chapter 25, The MSC Editor for default file extensions.
- If a file with this default name already exists, you are required to specify a name.
- Click OK to confirm the file name and to save the MSC.
Figure 88 : Saving a New MSC.
-----
(fig)

-----
A global save can be made of all the MSCs that are open in the current session, and that are modified.
To save all MSCs:
- Select Save All from the File menu. All MSCs which are modified are saved. (You will be prompted to specify a file for new diagrams that have never been saved on file.)
SDT allows you to save an MSC in the MSC-PR format. See "Generating MSC-PR (Textual Format)" on page 235 for how to do this.
To append an MSC Reference to the Organizer:
- Select the Organizer's Add Diagram command from the Edit menu. A dialog is issued:
Figure 89 : Adding an MSC
-----
(fig)

-----
- Make sure the diagram type is set to MSC. If not, select MSC from the Diagram Type option menu.
- Type in the name of the MSC in the Diagram Name field. (You need of course to know the name of the MSC that you want to add).
- Make sure the As Associated Document radio button is on.
- Click the Add button. An SDT Connect Diagram is issued, prompting you to connect the MSC reference to a file on which the MSC is stored.
Figure 90 : Connecting the MSC to a File.
-----
(fig)

-----
- If the checks passed without errors, the MSC is added to the Organizer's Associated Documents Area, sorted alphabetically.
The MSC Editor allows you to save a copy of an MSC that you are working on.
To save a copy of an MSC and continue working with the new copy:
- Select Save As from the File menu. A Standard File Selection Dialog is issued.
- The default file name which is suggested is the same file as the original was stored on, appended with an integer suffix (1, 2,..., N) in order to build up a unique file name.
- Click the OK button to confirm. The MSC is copied to the specified file, the file containing the original is closed, and the window from where the save was made remains open for editing the newly created file.
To save a copy of an MSC and continue working with the original:
- Select Save As from the File menu. A Standard File Selection Dialog is issued.
- The default file name which is suggested is the same file as the original was stored on, appended with an integer suffix (1, 2,...,N) that guarantees a unique file name. If the suggested file name is not suitable, you may type the new filename or the directory path and filename required into the File field.
- Click the OK button to confirm. The MSC is saved on the specified file, and the window with the file from where the save was made remains open for editing.
Closing an MSC also means closing all instances of all windows displaying that MSC.
To close an MSC:
- Select the Close Diagram menu choice from the File menu. The command should be performed from the window showing the diagram to close.
- If modifications have been made to a diagram, an SDT Close dialog is shown providing the opportunity to save the modifications before closing the diagram - see Figure 93 below.
Figure 93 : Prompting to Save an MSC when Closing it.
-----
(fig)

-----
- Clicking Save saves the MSC and closes it.
- Clicking No save closes the MSC without saving it first.
- Clicking Cancel closes the dialog without closing the diagram.
The MSC Editor supports printing one MSC at the time, or a selection of objects contained in an MSC. A number of options are available for customizing the resulting printout.
How to print an MSC is described in chapter 4, Printing Information, on page 263.
This section describes how to transfer to an MSC that is currently read by the MSC Editor. (The MSC that you would like to see may reside in a window which is not on top of the screen.)
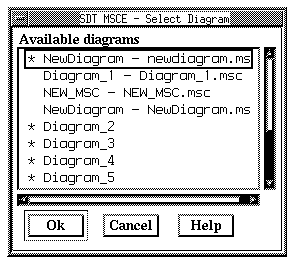
The Diagrams menu menu shows all MSCs (up to a maximum of the last nine to have been opened). If more than nine MSCs are open, a tenth menu choice, List All, provides access to a list dialog where all MSCs currently opened are listed.
To transfer to one of the MSCs opened by the MSC Editor:
- Click Diagrams to bring down the menu showing the MSCs.
- Then, select the required MSC (each menu choice identifies the MSC by its name followed by the file the MSC is stored on). The window containing the page is instantly displayed.
The MSC Editor has the ability to rearrange an MSC in order to apply a nicer appearance or to extract a subset of the instances that you are interested in. The following topics are discussed:
There are two ways an MSC can be resized:
When appending objects with the double-click facility, the Message Sequence Chart Editor will automatically enlarge the MSC size when the MSC has grown so that it reaches the bottom or right of the drawing area. The drawing area is enlarged according to the value of a preference parameter.
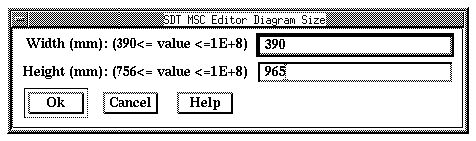
If the current size of an MSC is not adequate, you can resize it with a command.
To resize an MSC manually:
- Make sure the MSC Editor is displaying the MSC you want to resize. If not, transfer to the appropriate MSC (see "Transferring to an MSC" on page 176).
- From the Edit menu, select the menu choice Drawing Size. A dialog appears:
Figure 95 : Resizing an MSC.
-----
(fig)

-----
- Type in the new width and height for the MSC. You must type in values within the allowed range.
- Click OK to apply the new size. The MSC is resized accordingly.
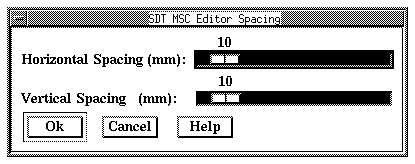
When the MSC Editor layouts an MSC, it makes use of a horizontal and vertical spacing parameter that affect the total height and width of the MSC. All instances and events on instances are positioned with an integer multiple of the spacing parameters.
To change the spacing:
- Make sure the MSC Editor is displaying the MSC on which you want to apply a new spacing. If not, transfer to the appropriate MSC (see "Transferring to an MSC" on page 176).
- From the Edit menu, select the Spacing command. The Spacing dialog is issued:
Figure 96 : Adjusting the Spacing Parameters.
-----
(fig)

-----
- Drag the sliders for a coarse adjustment. Click left or right on the slider bar for a fine adjustment.
- Smaller values will give the chart a compact appearance that may possibly make it more difficult to read. Text associated to symbols may overlap other symbols and text. Symbols may overlap each other.
- Larger values will give the chart a less cramped appearance and should make it easier to read. The price of this enhanced readability is that the MSC will require more space when printing it.
- Apply the new spacing parameters by clicking OK. The MSC is redrawn, using the new spacing parameters for positioning of objects.
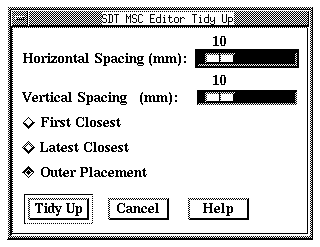
The MSC Editor can reform and redraw an MSC for you, so that you don't need to spend a large amount of time on the tedious task of rearranging the layout.
To tidy up an MSC:
- Make sure the MSC you want to rearrange is the one currently being displayed in the MSC Editor.
- From the Tools menu, select the Tidy Up command. A dialog is issued.
Figure 97 : Tidying Up an MSC.
-----
(fig)

-----
- Adjust the horizontal and vertical spacing to the values of your choice by dragging the sliders (for a coarse adjustment) or clicking left or right on the slider bar (for a fine adjustment).
- Smaller values will give the chart a compact appearance that may possibly make it more difficult to read. Text associated to symbols may overlap other symbols and text. Symbols may overlap each other.
- Larger values will give the chart a less cramped appearance and should make it easier to read, to the price of a larger size.
- Select the desired grouping mode for the adjustment of dynamically created instances in relation to their parent instances.
- When the options are adjusted, click the Tidy Up button. The editor compresses and reorders the information in the diagram, as if you had redrawn the MSC using the double-click facility when positioning all objects.
---------------------------------------------------------------
Caution!
Tidying up an MSC cannot be undone. The appearance of the origi
nal diagram may become modified to a large extent.
---------------------------------------------------------------
Having created an MSC, you may be interested in some of the instances only (this is in particular true when you have generated an MSC when tracing a simulator). The MSC Editor can filter a diagram for you.
To filter an MSC:
- Make sure the MSC you want to filter is the one currently being displayed in the MSC Editor.
- If you only want the currently selected objects and their instances to be displayed in the new, filtered MSC, make sure you have selected these objects first.
- Select the Filter menu choice from the Tools menu. The Filter dialog is issued.
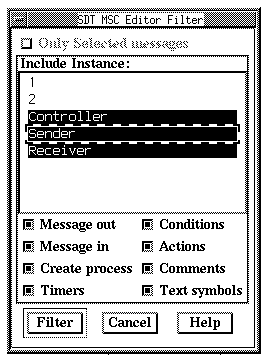
Figure 101 : Filtering an MSC.
-----
(fig)

-----
- Select the instances to be included in the new MSC from the Include Instance list.
- Clicking an instance a second time deselects it.
- If you only want the selected objects and their instances to be included, turn the Only Selected Messages button to on.
- You can restrict the types of objects to be included in the new MSC by turning their corresponding toggle buttons off. By default, all types of objects are included.
- Click the Filter button. The MSC Editor filters the source diagram and produces a new, unsaved MSC. The resulting MSC is rearranged as if you had applied the Tidy Up command.
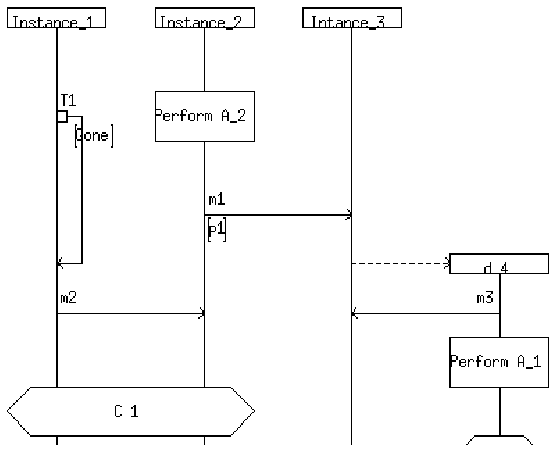
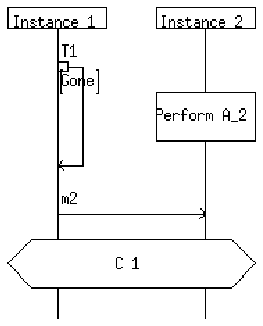
Example 5 : Filtering an MSC.

Figure 102 : The Original Unfiltered Diagram.
-----
(fig)

-----
Filtering the diagram with Instance_1 and Instance_2 selected in the Include Instance list results in Figure 103 on page 185:
Figure 103 : The Filtered Diagram.
-----
(fig)

-----
Each MSC Editor window shows one MSC. The MSC Editor is a multi-window tool, allowing you to open new windows on a diagram and close windows that are no longer needed.
A newly opened window is a mirror image of the window from which the selection to open a window was made. Multiple windows may be opened (one at a time) and are all the same as the original. Any subsequent modifications made will reflect the same in either the original window, or any of the newly opened window(s). This option affords the possibility of viewing in more than one window, and can ideally be used in conjunction with the scaling factor when looking at a detailed MSC.
The window managing functions you can perform are:
To open a new window:
- Go to the window from which you want to open a window.
- Select New Window from the Window menu. The replicated window is opened almost instantaneously, and its screen position is offset from the window from where it was activated.
This command overrides the Always new Window option of the Editor Options dialog from the View menu, when it is toggled to the off position.
To close a window:
- Go to the MSC Editor window you wish to close.
- Select Close Window from the Windows menu.
- If the window you want to close happens to be the last window opened by the MSC Editor, the MSC Editor will terminate. If any changes were applied on any of the pages, you will be prompted to save the changes, or to cancel the exit request.
The various component parts of the MSC Editor window can be shown or hidden as required. If they are hidden, it increases the drawing area available to be used in the creation or modification of a diagram.
All the available options for hiding and showing parts of the window can be found in the dialog box accessed via the Window Options command on the View menu - see Figure 392 on page 1331. All of these options can also be set as preferences.
This page intentionally left blank
Table of Contents  Next Chapter