 Table of Contents
  Previous Chapter 26 The Search List Manager
The Search List Manager is the SDT-3 tool that handles SDT-2 search lists. Search lists are optional in SDT-3, but are still supported for backward compatibility reasons.
The Search List Manager replaces the FileViewer tool in SDT-2, even though the functionality differs slightly.
This chapter contains a reference manual to the Search List Manager; the functionality it provides, its menus, windows and symbols.
The Search List Manager operates on search list files. A search list file contains an ordered list of directories in which diagrams making up a system are stored. Search lists were in SDT-2 needed for making file bindings of diagrams. They are optional in SDT-3, since diagrams always have an explicit file binding in the Organizer. The user may at any time re-bind the diagrams according to a search list, but this operation is performed in the Organizer. Operations in the Search List Manager do not directly affect the file bindings in the Organizer.
Previous Chapter 26 The Search List Manager
The Search List Manager is the SDT-3 tool that handles SDT-2 search lists. Search lists are optional in SDT-3, but are still supported for backward compatibility reasons.
The Search List Manager replaces the FileViewer tool in SDT-2, even though the functionality differs slightly.
This chapter contains a reference manual to the Search List Manager; the functionality it provides, its menus, windows and symbols.
The Search List Manager operates on search list files. A search list file contains an ordered list of directories in which diagrams making up a system are stored. Search lists were in SDT-2 needed for making file bindings of diagrams. They are optional in SDT-3, since diagrams always have an explicit file binding in the Organizer. The user may at any time re-bind the diagrams according to a search list, but this operation is performed in the Organizer. Operations in the Search List Manager do not directly affect the file bindings in the Organizer.
The directories listed in a search list file are by the Search List Manager scanned for SDT diagram files. Files that are recognized contains an SDL/MSC diagram or an SDL Overview diagram. The following diagram types are supported:
- Package
- System, system type
- Block, block type
- Substructure
- Process, process type
- Procedure, procedure type
- Macro
- Service
- Operator
- MSC
- Overview.
The Search List Manager has a single window, the Main window. It contains the following parts:
The general characteristics of a Main window are described in chapter 21, The SDT Graphical User Interface.
-----------------------------------------------------------------
Note:
If the currently opened search list has been modified, each text
shown in the status bar is prefixed by a * character.
-----------------------------------------------------------------
When the Search List Manager is started, it opens and reads a default search list file. The default file name is sdt.ssl, but this could be changed with a preference value. If the search list file exists and can be read, its contents are shown in the drawing area of the Main window.
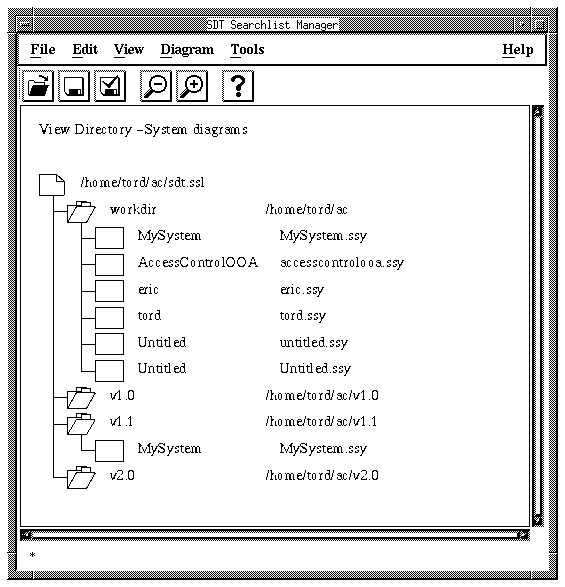
Figure 412 : The Main Window.
-----
(fig)

-----
The drawing area shows the structure of a search list as an hierarchical tree. The tree structure is displayed as an indented list of icons, with additional textual information on each line (see Figure 412). The user can change the amount of information displayed in the tree with the menu choice View Options in the View menu.
There are three possible levels in the structure:
--------------------------------------------------------------------------------
(fig) Ę Search list file
The top level is a search list file. It has a special file icon with the
file name displayed to the right.
(fig) Ę Directories
The second level is the directories specified in the search list. They
have a special folder icon. To the right of the icon, the logical name
and the physical file name of the directories are displayed by
default. The first directory in the list is always the current workdir,
i.e. the directory where the search list file resides.
A directory icon is marked invalid if the directory does not exist or
is unaccessible. An invalid directory is recognized by having all its
text displayed in italics.
--------------------------------------------------------------------------------
- Diagrams
The third level is the diagrams contained in the directories. They have the icons similar to the ones used in the Organizer's Main window (see "Referenced Diagram icons" and "Referenced Diagram Type icons" on page 1061). To the right of the icons, the diagrams' name and file name are displayed by default.
The diagrams in the directories are not shown by default when a search list is opened, or when a directory is added to the search list. This must be done explicitly by using menu choices in the View Menu. The user can also control which diagrams to display by setting appropriate diagram filters through the same menu.
Above the tree structure in the drawing area, the view title is displayed. It is a text indicating what view is currently shown in the tree. The view title could be one of the following:
- Search List Content
The default title when the Search List Manager is started or a new search list is opened.
- No Current View
No search list is in the view, for instance if the default search list file is not found when the Search List Manager is started.
- <View mode> - <Diagram type filter>
The view title after a view operation has been performed. The view modes are selected from the View menu (see "View Menu" on page 1381). The diagram type filter is selected in the View Options dialog (see "View Options" on page 1382).
In the Search List Manager, it is possible to execute an arbitrary operating system command on some or all of the diagrams. The diagrams affected by the command are the ones that have been marked especially for this. Only diagrams that are visible in the tree can be marked.
A marked diagram has a "*" in front of the diagram name in the tree. The marks are cleared whenever the view mode is changed, the tree structure is changed or updated, or a diagram filter is applied.
The command execution is a two step operation. First a range of diagrams are marked and then a command is applied on each of the marked diagrams.
The marking and command execution is performed by commands in the Diagram Menu. For more information, see "Mark" on page 1386 and "User Command" on page 1387.
Double clicking on an object in the tree structure invokes a default operation:
----------------------------------------------------------------
Object            Menu command reference
----------------------------------------------------------------
Search list file  "First Occurrence" on page 1381
Directories       "View Directory / Collapse Directory" on page
                  1381
Diagrams          "All Occurrences" on page 1382
----------------------------------------------------------------
The following quick button is special to the Main window. The general quick buttons are described in "Quick Buttons" on page 1035.
--------------------------------------------------------------------------------
(fig)  Refresh
       Clears all diagrams in the tree and re-reads the search list directories
       from the search list file.
--------------------------------------------------------------------------------
Figure 413 : The File Menu.
-----
(fig)

-----
Clears the drawing area and creates a new, empty search list, named "Untitled." Only the top level of the tree is shown.
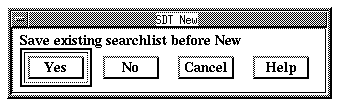
If a currently opened search list was modified, the user gets the possibility to save it first:
Figure 414 : The Save Before Dialog.
-----
(fig)

-----
- Clicking Yes saves the search list to the corresponding file, if a file name has been defined. If no file name exists, the Save As dialog is opened (see "Save As" on page 1376).
- Clicking No does not save the search list and its contents are lost.
Opens an existing search list file.
If the currently opened search list was modified, the user gets the possibility to save it first. The same type of dialog as for the New command is opened (see "New" on page 1375).
The Open dialog is a Standard File Selection Dialog with the file name filter set to *.ssl.
If the specified search list file is successfully opened, the former contents of the drawing area is replaced with the new search list structure. The search list file and the directories it contains are shown, but not the diagrams in the directories.
Saves the current search list under the existing file name. The menu choice is dimmed if:
- The search list is new and unnamed
- The search list file is write protected
- The search list is not modified.
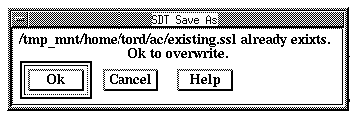
Saves the current search list under a new file name.
A Standard File Selection Dialog is opened with the default file name set to the name of the current search list and the file name filter set to *.ssl.
If the specified file already exists, a confirmation dialog asks the user whether to overwrite the file.
Figure 415 : The Save As Confirmation Dialog.
-----
(fig)

-----
- Clicking the OK button saves the search list on the existing file
- Clicking the Cancel button returns control to the Search List Manager without saving the search list.
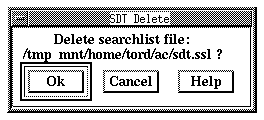
Deletes an existing search list file from the file system.
A Standard File Selection Dialog is opened. The currently opened search list cannot be deleted; if it is specified in the dialog, a message box with a warning is opened and the delete operation is aborted.
The user must confirm this operation with a dialog:
Figure 416 : The Delete Confirmation Dialog.
-----
(fig)

-----
- Clicking the OK button deletes the selected search list file and returns control to the Search List Manager.
- Clicking the Cancel button cancels the delete operation and returns control to the Delete dialog.
Prints the contents of the drawing area. This menu choice starts the Print Utility; see the chapter "The Print Utility" on page 1439 for more information.
Exits the Search List Manager.
If the currently opened search list was modified, the user gets the possibility to save it first. The same type of dialog as for the New command is opened (see "New" on page 1375).
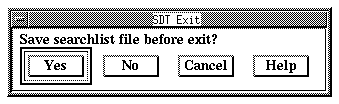
Figure 417 : The Save Before Exit Confirmation Dialog.
-----
(fig)

-----
- Clicking Yes saves the current search list on file and exits the Search List Manager.
- Clicking No exits the tool without saving the search list on file.
- Clicking Cancel cancels the operation and returns control to the Search List Manager without saving the search list.
If no information was modified, the Search List Manager exits without confirmation.
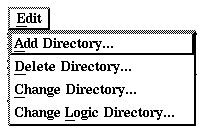
The commands in the Edit menu operates on a selected directory in the tree structure. If no directory is selected, these commands are dimmed.
Figure 418 : Edit Menu.
-----
(fig)

-----
Adds a directory to the search list. It is placed after the currently selected directory.
A Standard Directory Selection Dialog is opened. The logical directory name is extracted from the selected directory path and is set to the name of the last directory in the path. Both the logical name and the directory path must be unique in the search list. If a match is encountered, the user is notified via a message box, and the new directory is not added.
The diagrams in the new directory are not shown.
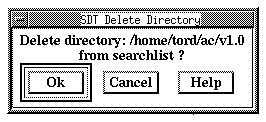
Deletes the selected directory from the search list. The workdir cannot be deleted; if it is selected, this menu choice is dimmed.
The user must confirm this operation with a dialog:
Figure 419 : The Delete Directory Confirmation Dialog.
-----
(fig)

-----
- Clicking OK deletes the selected directory from the search list
- Clicking Cancel cancels the operation without deleting the directory.
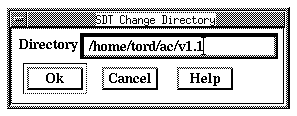
Changes the currently selected directory to a new one. The workdir cannot be changed; if it is selected, this menu choice is dimmed.
The directory path is edited in the following dialog:
Figure 420 : The Change Directory Dialog.
-----
(fig)

-----
- The new directory path must not exist in the search list. If it already exists, the user is notified via a message box, and the directory is not changed.
- The diagrams in the changed directory are not shown.
- Clicking OK changes the selected directory to the directory that is specified in the Directory text field.
- Clicking Cancel closes the dialog without changing the directory.
Changes the logical name of the currently selected directory. The logical name of the workdir cannot be changed; if it is selected, this menu choice is dimmed.
The logical name is edited in the following dialog:
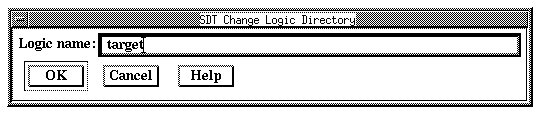
Figure 421 : The Change Logic Directory Dialog.
-----
(fig)

-----
- The new logical name must not exist in the search list. If it already exists, the user is notified via a message box, and the logical name is not changed.
- Clicking OK applies the new logical name as specified in the Directory text field.
- Clicking Cancel closes the dialog without changing the name.
Figure 422 : View Menu.
-----
(fig)

-----
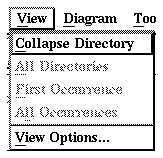
This menu choice toggles between two names depending on the state of the selected directory. The menu choice is dimmed if no directory is selected or if the selected directory is marked invalid.
View Directory displays the diagrams in the selected directory according to the diagram filter settings.
Collapse Directory collapses the selected directory, i.e. all diagrams displayed in the directory are cleared.
Displays the diagrams in all directories in the search list according to the diagram filter settings. This menu choice is dimmed if a directory or a diagram is selected.
Displays only the first occurrence of each diagram in the search list according to the diagram filter settings. This menu choice is dimmed if a directory or a diagram is selected.
The directories are searched in the order they appear in the search list. Each diagram is placed in the tree structure under the directory where it was first found. If all diagrams in the search list exist in one directory only, this command is identical to All Directories above.
The tree is cleared from existing diagrams before the tree is updated.
Displays all occurrences of the selected diagram found in the directories in the search list. This menu choice is dimmed if a diagram is not selected.
Only the occurrences of the selected diagram are displayed in the tree after this operation. The tree is cleared from existing diagrams before the tree is updated.
Sets options for controlling the appearance of the Main window and the tree structure in the drawing area.
The options are set in a modeless dialog, i.e. the Search List Manager can continue working without waiting for the dialog to be closed.
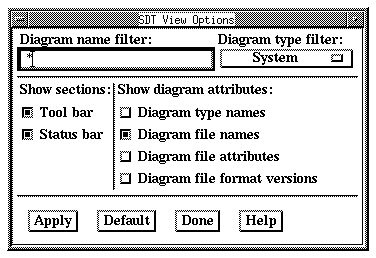
Figure 423 : The View Options Dialog.
-----
(fig)

-----
The items in the View Options dialog is grouped into the following three sections. The figure above shows the default settings.
The diagram filter options controls the type and names of the diagrams to be shown in the tree, once diagrams are displayed. These options are dimmed if the current view operation is All Occurrences.
- Diagram Name Filter
A certain diagram name or a wildcard may be specified. A wildcard is either "*" by itself (all names) or a string directly followed by a "*" (all names starting with the string). The default is "*".
- Diagram Type Filter
A certain diagram type, All diagrams or No diagrams may be selected from this option menu. The default is System diagrams.
The Show Sections options control which parts of the Main window to show.
The Show Diagram Attributes options control which attributes to show for the diagrams in the tree. Some of the attributes also apply to directories and the search list file. The attributes appear as tab separated text strings in the order listed below.
- Diagram Type Names
Show/hide the type of diagrams.
- Diagram File Names
Show/hide the file name of diagrams and the search list file. For directories, the directory path is affected.
- Diagram File Attributes
Show/hide some file attributes of diagrams, directories and the search list file. The file protection and file owner are shown in UNIX style.
- Diagram File Format Versions
Show/hide the SDT file format version of the diagrams.
- Apply
Applies the changes in the dialog settings to the Search List Manager's view, but does not close the dialog.
- Default
Resets all options in the dialog to the default values.
- Done
Closes the dialog, without applying any changes made since the last Apply.
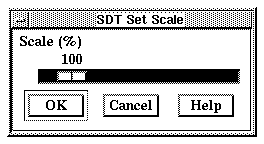
This menu choice sets the scale used in the Search List Manager window.
The scale is set using a modal dialog:
Figure 424 : The Set Scale Dialog.
-----
(fig)

-----
- The scale could be set between 20% and 800% by using the Slide Bar. 100% is the default.
- Pressing Set changes the scale and brings down the dialog.
- Pressing Cancel closes the dialog without changing the scale.
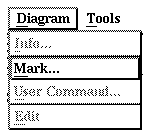
Figure 425 : Diagram Menu.
-----
(fig)

-----
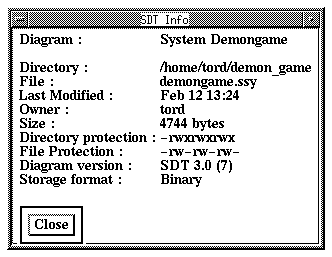
Shows details about the selected diagram in a dialog. This menu choice is dimmed if no diagram is selected.
When the dialog is opened, the user can select another diagram in the tree. The dialog is then immediately updated.
Figure 426 : The Info Dialog.
-----
(fig)

-----
The dialog displays the following information:
- The directory where the diagram is stored
- The name of the diagram file
- When the diagram file was last modified
- The owner of the diagram file
- The size of the diagram file
- The UNIX protection of the directory where the diagram is stored
- The UNIX protection of the diagram file
- The file format version of the diagram
- The diagram storage format (binary or ASCII)
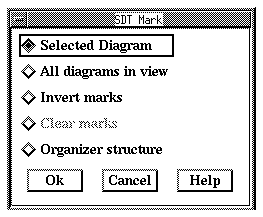
Specifies how marking of diagrams should be done. For more information on marking, see "Command Execution on Marked Diagrams" on page 1374.
The marking method is selected in a dialog:
Figure 427 : The Mark Dialog.
-----
(fig)

-----
- Selected Diagram
Marks the selected diagram without affecting any other marks. Dimmed if no diagram is selected.
- All diagrams in view
Marks all diagrams visible in the tree.
- Invert marks
Inverts the marking of all visible diagrams, i.e. marked diagrams become unmarked and the other way around.
- Clear marks
Clears the marks of all marked diagrams. Dimmed if no diagrams are marked.
- Organizer structure
Marks all diagrams that are found in the Organizer's diagram structure without affecting any other marks.
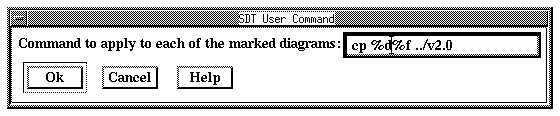
Executes an operating system command on the marked diagrams. This menu choice is dimmed if no diagrams are marked.
The command to execute is specified in a dialog:
Figure 428 : The User Command Dialog.
-----
(fig)

-----
The following references to diagram attributes can be specified in the command:
- %d refers to the directory where the diagram is placed
- %f refers to the diagram's file name, excluding the path
Clicking OK executes the specified command, including the above references, on each of the marked diagrams. User input is disabled while the command is executed.
Text output from the executed command is displayed on standard output and standard error.
---------------------------------------------------------
Note:
The command must not involve any requests for user input.
---------------------------------------------------------
The marked diagrams are still marked after the command has been completed.
Example 32 : User Command in Search List Manager
To copy marked diagrams to a backup directory, the following command could be specified:
cp %d/%f /home/user/backup
Starts an SDL or MSC Editor on the selected diagram. This menu choice is dimmed if no diagram is selected.
Figure 429 : Tools Menu.
-----
(fig)

-----
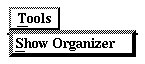
Raises the Organizer's Main window.
The following tables lists the menu choices in the Main window popup menus and a reference to the corresponding menu choice in the menu bar.
--------------------------------------------------
First Occurrence  "First Occurrence" on page 1381.
All Directories   "All Directories" on page 1381.
--------------------------------------------------
-------------------------------------------------------------
View Directory /

   "View Directory / Collapse Directory" on
Collapse Directory  page 1381.
Add Directory       "Add Directory" on page 1379.
Delete Directory    "Delete Directory" on page 1379.
Change Directory    "Change Directory" on page 1379.
Change Logic        "Change Logic Directory" on page 1380.
Directory
-------------------------------------------------------------
------------------------------------------------------
All Occurrences  "All Occurrences" on page 1382.
Info             "Info" on page 1385.
Mark / UnMark    Marks the diagram. If it already was
                 marked, the mark is cleared.


                 "Mark" on page 1386.
Edit             "Edit" on page 1388.
------------------------------------------------------
-------------------------------------------------------
View First Occurrence  "First Occurrence" on page 1381.
View All Directories   "All Directories" on page 1381.
View Options           "View Options" on page 1382.
-------------------------------------------------------
This page intentionally left blank
Table of Contents  Next Chapter