 Table of Contents
  Previous Chapter 3 Editing MSC Diagrams
In order to select one object, simply click the object to be selected. The object is marked in order to indicate that it is selected. Other related topics include the following:
Previous Chapter 3 Editing MSC Diagrams
In order to select one object, simply click the object to be selected. The object is marked in order to indicate that it is selected. Other related topics include the following:
Selected objects are marked as follows:
There are several methods of selecting more than one object. You can, for instance, proceed as follows:
In order to select more than one object:
- Point outside the group of objects that you want to select. Press the left mouse button and drag the mouse to form a dashed selection border around the objects.
- Release the mouse button. The objects are marked to indicate that they are selected.
You can also use the <Shift> key in conjunction with clicking with the mouse. See "Extending the Selection" on page 193.
An object may have other objects associated to it. When you select an object, all of the object's attributes are also selected. Here are the basic rules:
- A symbol may have associated lines and text attributes.
- A line may have associated text attributes.
- A text object has no associated attributes.

Selecting a text symbol selects the text symbol and updates the text window with the contents of the symbol.
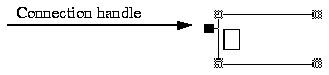
Selecting a comment symbol selects the comment symbol and updates the text window with the contents of the symbol. The connection handle is made visible.

Selecting the instance head symbol selects the instance head symbol, the instance axis, and any related process create line. The text window is updated to contain the instance name.
Figure 106 : Selecting an Instance Head.
-----
(fig)

-----
Selecting an instance axis implicitly selects the instance head symbol. The text window shows the instance kind.
Selecting the instance end symbol selects only the symbol itself. It has no associated text.

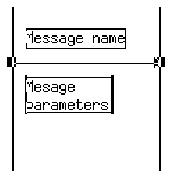
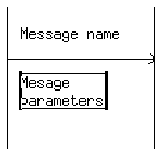
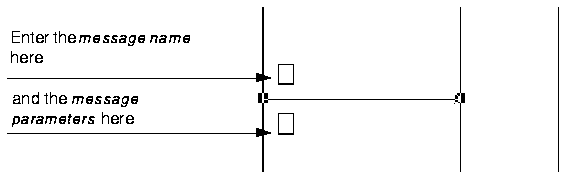
Selecting a message selects the message and its textual elements. The text window is updated with the message name.
Figure 107 : Selecting a Message. Figure legend: The text attributes (message
		nameand message parameters) are also selected.
-----
(fig)


-----
Figure 108 : Selecting the Message Parameters Only.Figure legend: Only the
		messageparameters are selected.
-----
(fig)


-----

Selecting a condition symbol selects the condition symbol and its name. The text window is updated with the condition name and the Connect menu choice in the Edit menu (see page 1327) is made available.

Selecting a timer selects the timer and its textual elements (the timer name and the timer parameters). The text window is updated with the timer name.

Selecting an action symbol selects the symbol and updates the text window with the text contained in the action symbol.

Selecting a create process symbol selects the symbol and updates the text window with the create parameters.

Selecting a stop symbol selects only the symbol itself. It has no associated text.

Selecting a coregion symbol selects only the symbol itself. It has no associated text.
You can extend the scope of a selection to include more symbols or lines, as follows:
- Press the <Shift> key.
- Click a symbol or line that is not currently selected. The object will be included in the current selection.
Whenever you select multiple symbols or lines, it is possible to deselect a subset of them without cancelling the entire selection. You can do this as follows:
- Press the <Shift> key.
- Click a currently selected symbol or line. The object will be deselected.
In an MSC, objects may overlap each other. A layer order determines which object will be selected if you point to and click a stack of overlapping objects.
---------------------------------------------------------
Note:
An object that is selected is always on top of the stack.
---------------------------------------------------------
The following layer order applies to MSCs, where number 1 represents the top object:
- The process create symbol
- The message name attribute
- The message parameters attribute
- The message base point (source)
- The message end point (target)
- The text in timer symbols
- Message lines, the source end of process create lines, timer symbols, coregion symbols, action symbols, instance end symbols, condition symbols and stop symbols
- Instance name text attributes and instance kind text attributes
- Instance head symbols
- Instance axis lines
- Text symbols, comment symbols and the additional heading symbol
- Heading symbols.
The text symbol and comment symbol are handled separately because they may overlap all other MSC objects. When you append text, the size of the symbol may increase. Therefore, they are always placed in a bottom layer beneath all other symbols and lines.
To cancel a selection:
- Simply click any portion of the drawing area where no object is displayed.
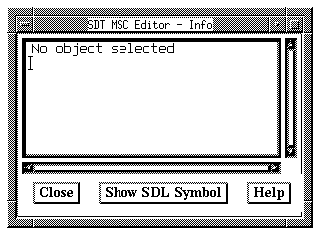
The info window is an auxiliary window that provides additional information about a selected object.
To open an info window:
- Go to the MSC Editor window showing the diagram on which you want additional information.
- Select Info Window from the Windows menu. The info window is immediately displayed.
Figure 109 : Requesting Additional Information on an Object.Figure legend: The
		windowreads "No object selected"when no object is currently selected in the MSC
		Editor.
-----
(fig)


-----
- When the info window is no longer needed, you can close it by clicking the Close button.
You can add a symbol from the symbol menu to a chart in two ways:
- Automatically, by double-clicking the symbol in the symbol menu. The symbol will be placed at a location which is defined according to the type of symbol and in relation to the current selection.
- Manually, by first selecting it in the symbol menu and then placing it at the desired location in the drawing area.
The topics that are discussed in this section are:
To select a symbol in the symbol menu, perform these steps:
- Point to the appropriate symbol in the symbol menu. The symbol must be valid.
- Click the symbol. The symbol is highlighted indicating that it is selected.
You can cancel the selection of a symbol either by clicking any part of the symbol menu that contains no symbol, or by pressing <Esc>.
- Move the mouse pointer to the location where you want to place the symbol. As soon as the mouse leaves the symbol menu window, a symbol appears as a dashed rectangle in the drawing area, following the mouse motion.
- Click at the desired location. The symbol is drawn and adjusted to the spacing grid. You must click a location where the symbol is allowed to be placed.
- You may now enter the symbol's text attributes.
The MSCE provides an automatic spacing facility for easier positioning of symbols and lines.
When you draw and move symbols and lines, each object is positioned on the closest intersection in the spacing grid. The resolution of the grid is variable, and can be set using the Spacing command from the Edit menu.
-------------------------------------------------------------------
Note:
The text and comment symbol do not adhere to the grid; they can be
placed freely.
-------------------------------------------------------------------
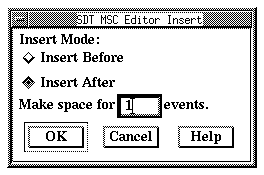
When working on an MSC, the space available between two events on an instance axis may not be sufficient for inserting new objects on the instance axis. The MSC Editor can reorganize the MSC in order to provide the required space.
To insert space:
- Select the object before or after where to insert space. The object may either reside on one instance axis only or may connect two instances.
- From the Edit menu, select the Make Space command. The Insert dialog is issued:
Figure 110 : Insert Space for new Events.
-----
(fig)

-----
----------------------------------------------------------------------
(fig)
- Alternatively click the quick button for Make space for new
events.
----------------------------------------------------------------------
- Turn the appropriate radio button on, depending on if you have selected the object before or after where to insert space.
- Type in the required number of events to insert (the default is 1 event).
- Click OK. The MSC is rearranged and space is created on the instance axis(es).
To remove unnecessary space between events:
- Select the object before or after where to remove space.
------------------------------------------------------------------
(fig)  2.  Click the quick button for Remove space between events.
------------------------------------------------------------------
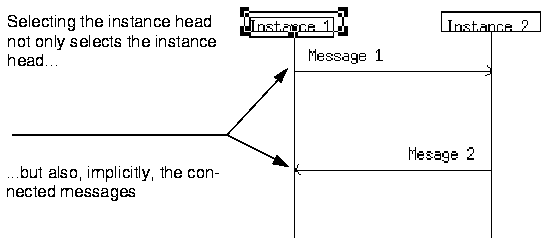
You can remove any selected object(s) with the following sequence of operations:
- Select the objects to remove.
- Choose Clear from the Edit menu. The objects are removed.
- Alternatively, you can activate the pop-up menu or type the <Delete> key.
----------------------------------------------------------------------
Note:
Selecting an object to clear may implicitly select other objects. The
Clear command will delete them all. See example on page 199.
----------------------------------------------------------------------
Figure 111 : Selecting an Object that has Associated Objects.Figure legend:
		Clearingthe instance Instance_1 will also remove the messages Message 1 and Message 2!
-----
(fig)


-----

- Select, if required, an object that you want to use as reference point when positioning the text symbol. Double-click the text symbol in the symbol menu.
- If no object is selected in the drawing area, double-clicking the text symbol in the symbol menu places it at the first available position at the left of the drawing area, starting from the top of the diagram.
- If an object has been selected, the text symbol will be placed immediately left or right to the selected object, according to the Insert Mode (see "Insert Options" on page 1334 in chapter 25, The MSC Editor).
- Fill in the text symbol's contents.
To add a text symbol manually:
- Select the text symbol in the symbol menu.
- Place the text symbol where suitable. The text symbol can be positioned anywhere in the drawing area.
- Type the text.

The following conditions apply to comment symbols in the MSC Editor:
- A comment symbol can only be connected to one symbol or event.
- An object may be connected to only one comment symbol.
- A comment symbol cannot be connected to another comment symbol, an additional heading symbol or a text symbol.
To add a comment symbol automatically, do the following:
- Select the object to which you wish to connect the comment.
- Double-click the comment symbol in the symbol menu. The symbol will be placed next to the selected object according to the insert mode (see "Insert Options" on page 1334 in chapter 25, The MSC Editor) connected to the selected object.
- Fill in the comment text.
To add a comment symbol manually:
- Select the comment symbol in the symbol menu.
- Place the comment symbol where suitable and release the mouse. The comment symbol can be positioned anywhere in the drawing area.
- Drag the handle that appears on the comment symbol. As soon as mouse motion has begun, a dashed line appears, following the mouse pointer. From now on, you can release the mouse.
- Click on the symbol you want to comment (any symbol except from a comment symbol, additional heading and text symbol can be connected). The line is drawn accordingly.
- Terminate by entering the comment text. The text symbol will adjust in size as text is entered. The comment symbol cannot be resized.

When you add an instance head symbol, an instance axis line is drawn automatically that connects the symbol to the bottom of the drawing area. The instance axis line cannot be drawn manually. It will be truncated when you add or move an instance end or stop symbol upwards (or elongated if you move the instance end or stop symbol downwards). See "Adding an Instance End Symbol" on page 203 and "Adding a Stop Symbol" on page 216.
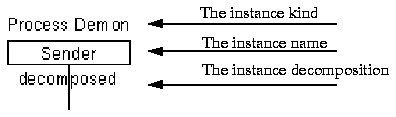
The instance head symbol has three text fields:
You can visualize an instance that is started dynamically by using the process create line. See "Drawing a Process Create" on page 214.
- Select, if required, an object that you want to use as reference point when positioning the instance head. Double-click the instance head symbol in the symbol menu.
- If no object is selected in the drawing area, double-clicking the symbol in the symbol menu places the instance head symbol on top of the MSC, at the first available location starting from the left.
- If an object has been selected, the instance head symbol will be placed next to the selected object according to the Insert Mode (see "Insert Options" on page 1334 in chapter 25, The MSC Editor).
- Fill in the instance head text fields. See Figure 112 on page 201.
To insert an instance head manually:
- Select the instance head symbol in the symbol menu.
- Place the symbol in the drawing area. The instance head symbol can be positioned anywhere. An instance head and an instance axis are drawn.
- Fill in the text fields (see Figure 112 on page 201).
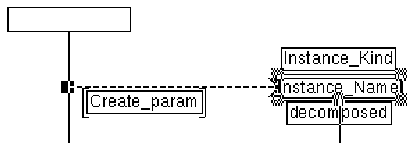
An instance may be decomposed into a sub MSC. This is indicated by a text attribute with the predefined contents decomposed located immediately beneath the instance head (see Figure 113).
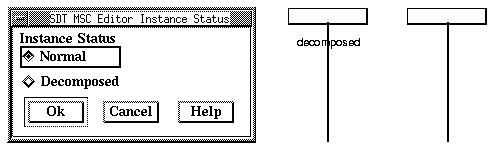
To change the status of an instance:
- Select the instance.
- From the Edit menu, select the Status command. The instance status dialog is issued
Figure 113 : Setting the Instance Status.
-----
(fig)

-----
- Turn the radio button of your choice on and click OK. The instance's status is changed accordingly.

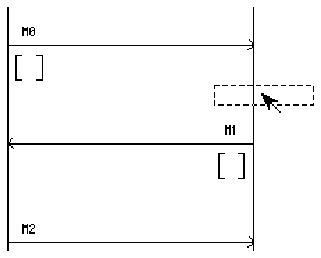
The instance end symbol determines the end of the description of an instance within an MSC. It does not describe the actual termination of the instance. This is done with the stop symbol, see "Adding a Stop Symbol" on page 216..
--------------------------------------------------------------------
Note:
If you position the instance end symbol above ("before") a symbol
or line on the instance axis, all symbols and lines below ("after")
that object will be deleted. See Figure 114 below.
--------------------------------------------------------------------
Figure 114 : Placing an Instance End.Figure legend: Placing the instance end
		symbolas shown would delete the messages M1 and M2 (but not M0). This is also true
		whenadding a stop symbol.
-----
(fig)


-----
To insert an instance end automatically:
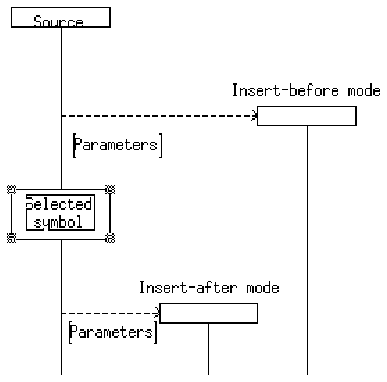
- Select an object on the instance axis immediately below (after) or above (before) the desired endpoint, depending on the Insert Mode (see "Insert Options" on page 1334 in chapter 25, The MSC Editor).
- Double-click the instance end symbol in the symbol menu.
- In Before selected object mode the selected object and all symbols and lines on the instance axis below it are deleted.
- In After selected object mode all symbols and lines on the instance axis below it are deleted.
- The instance axis line is truncated and is connected to the instance end symbol.
To insert an instance end manually:
- Position the symbol on (or close to) the desired endpoint of the instance axis line. The instance axis line is truncated and is connected to the instance end.

To draw a message you need to know from which instance it should be issued (the source instance) and to which instance it should be sent (the target instance).
To draw a message automatically:
- Depending on which insertion mode you have set, select the object on the source instance axis immediately above (before) or below (after) the place where you wish to draw the line.
- Double-click the message symbol in the symbol menu. The MSC editor inserts the base end of the message, with the target end of the message (the arrow) unconnected and facing left. (Figure 115)
Figure 115 : A Message with its End Unconnected.
-----
(fig)

-----
- Drag the target end to (or close to) the target instance axis and release the mouse button to connect the line.
- Terminate by filling the message name and its parameters.
Drawing a message manually is performed with the following steps:
- Click the message symbol in the symbol menu.
- Move the pointer into the drawing area. Point at or close to the source instance axis. Click once. From now on, the base of the message is fixed to the source instance. The message is displayed as a dashed line, following the mouse motion. (See Figure 116).
Figure 116 : The Message Base has been Connected.
-----
(fig)

-----
- Point at or close to the target instance axis.
- Click to connect the message end to the target instance. The line is connected
- Terminate by filling the message name and message parameters.
To enter the message name and the message parameter:
- The message name can be entered immediately.
- Click the parameter selection rectangle (the lower one) so that it is the only selected object. Type the parameter list. The brackets around the parameter list are not displayed on the screen until you have entered a parameter.
Figure 117 : The Message Text Fields.
------
(fig)

------
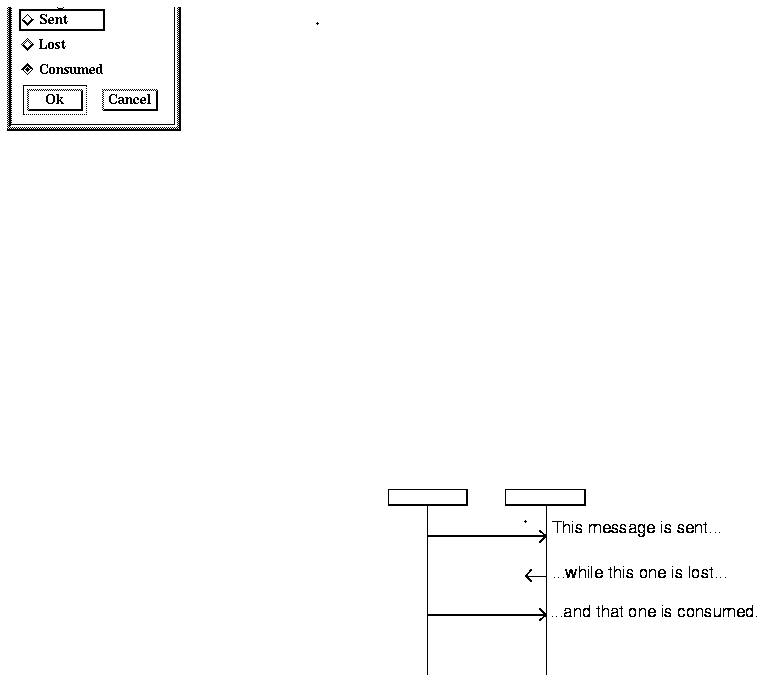
The status concept has been extended in SDT in order to map it to the SDL signal concept and to allow a way of expressing situations that are subject to occur in a real-time system(1), namely:
- A signal is sent to a receiver but has not yet been processed - sent. Typically, the signal is waiting in the receiver's input queue.
- A signal is sent to a nonexisting receiver - lost.
- A signal has been sent and is processed by the receiver - consumed.
The MSC Editor displays these differences through the use of an asterisk located close to the message's ending arrow (see Figure 118).
To change the status of a message:
- Select the message.
- From the Edit menu, select the Status command. The message status dialog is issued:
Figure 118 : Setting the Message Status.
-----
(fig)

-----
- Turn the radio button of your choice on and click OK. The message's status is changed accordingly.

Drawing a message-to-self is done similarly to drawing a message. (See "Drawing a Message" on page 205.) The source instance is however always the same as the target instance.
-------------------------------------------------------------------
Note:
A message-to-self is always drawn to the left of the instance axis.
-------------------------------------------------------------------

A condition describes either a global system state referring to all instances contained in the MSC or a state referring to a subset of instances (a non-global condition). The minimum subset is a single instance.
For two MSCs, the second is a continuation of the first if its initial global condition is identical to the final global condition of the first. Identifying an intermediate global condition can be used when breaking down an MSC into two parts.
By means of non-global conditions, combinations of MSCs with different sets of instances can also be defined. The continuation then refers only to the common subset of instances.
The following general rule applies to the continuation of two MSCs (MSC1 and MSC2, with a non-empty common set of instances).
MSC2 is a continuation of MSC1 if, for each instance which both MSCs have in common:
- MSC1 ends with a (non)global condition
- MSC2 begins with a corresponding(2) (non)global condition
- Each (non)global condition of MSC2 has a corresponding (non)global condition in MSC1.
To add a condition symbol automatically:
- Depending on which insert mode you have set (see "Insert Options" on page 1334 in chapter 25, The MSC Editor), select the object immediately above (before) or below (after) the place on the instance axis where you wish to insert the condition symbol.
- Double-click the condition symbol in the symbol menu.
- Type the condition name.
- Connect the condition to the instances of your choice. See"Connecting the Condition Symbol", below.
- Select the condition symbol in the symbol menu.
- Position the symbol at the desired point of the instance axis. The symbol is placed on the instance axis, pushing down subsequent symbols on the instance axis when necessary.
- Type the condition name.
- Connect the condition to the instances of your choice. See"Connecting the Condition Symbol", below.
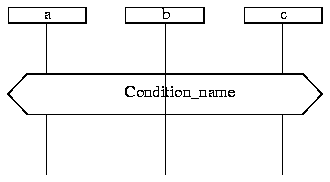
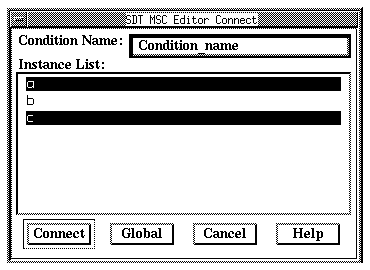
In the MSC Editor you connect the condition symbol to individual instances or perform a global connection.
Figure 119 : A Condition Symbol.Figure legend: The condition symbol with name
		Condition_nameis connected to the instances a and c, but not to the instance b.
-----
(fig)


-----
When a condition symbol straddles an instance axis to which it is not connected, the axis line is drawn through the symbol:
To connect a condition to a number of instance axes:
- Select the condition symbol to connect.
- Select the Connect menu choice under the Edit menu. The Connect dialog is presented:
Figure 120 : Connecting an Instance.
-----
(fig)

-----
- Select the instances to be connected in the instance list. The instances that will be connected are shown highlighted.
- To connect all instances to the condition (a global condition), click the Global button.
- Selecting an instance once again deselects it.
- Click the Connect button. The condition is redrawn according to the connection criteria you have specified.

Drawing a timer is done similarly to drawing a message line. As for the message-to-self, the source instance is always the same as the target instance.
----------------------------------------------------------
Note:
A timer is always drawn to the right of the instance axis.
----------------------------------------------------------
To draw a timer automatically:
- Depending on which insertion mode you have set, select the object on the instance axis immediately above (before) or below (after) the place where you wish to draw the timer.
- Double-click the timer symbol in the symbol menu. The MSC editor inserts the base end of the timer with the target end of the line (the arrow) unconnected and facing right. The timer is drawn with an asterisk, which signifies that the timer has the status set. (Figure 115)
Figure 121 : A Timer with its End Unconnected.
-----
(fig)

-----
- Drag the target end and release the mouse when you have reached the point where the timer should expire.
- If required, change the status of the timer, using the Status command from the Edit menu.
- Terminate by filling the timer name and its parameters.
Drawing a timer manually is performed with the following steps:
- Click the timer symbol in the symbol menu.
- Move the pointer into the drawing area. Point at or close to the instance axis. Click once. From now on, the base of the timer is fixed. The timer is displayed as a dashed vertical line, following the mouse motion.
- Point at or close to the point on the axis where the timer should expire.
- Click to connect the timer end. The timer end is connected and the timer is assigned the status consumed.
- Terminate by filling the timer name and parameters.
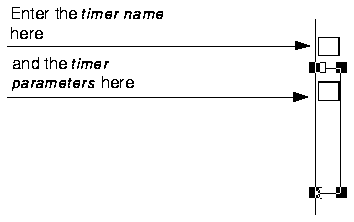
To enter the timer name and the timer parameter:
- The timer name can be entered immediately.
- Click the parameter selection rectangle (the lower one) so that it is the only selected object. Type the timer parameters. The brackets around the timer parameters are not displayed on the screen until you have filled their contents.
Figure 122 : The Timer Text Fields.
-----
(fig)

-----
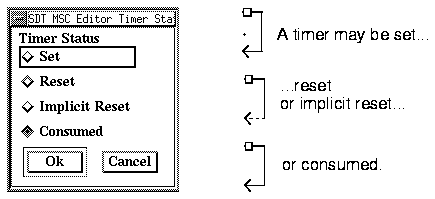
Z.120 specifies two appearances for the timer symbol, depending on whether the timer has expired (i.e. timeout) or whether the timer is reset. SDT extends the timer status concept to the following (in analogy to the message status, see page 207. The appearance of the timer is illustrated in Figure 123.
- A timer is activate but has not yet expired - set.
- A timer is reset or is assigned a new value while active - implicit reset.
To change the status of a timer:
- Select the timer.
- From the Edit menu, select the Status command. The timer status dialog is issued.
Figure 123 : Setting the Timer Status.
-----
(fig)

-----
- Turn the radio button of your choice on and click OK. The timer's status is changed accordingly.

An action symbol corresponds to the SDL task symbol. You may choose to fill it with formal or informal expressions.
To add the action symbol automatically:
- Depending on which insert mode you have set (see "Insert Options" on page 1334 in chapter 25, The MSC Editor), select the object on the desired instance axis immediately above (before) or below (after) the place where you wish to insert the symbol.
- Double-click the action symbol in the symbol menu. The symbol is placed on the instance axis, pushing down subsequent symbols on the instance axis when necessary.
- Fill in the action text.
To add the action manually:
- Select the action symbol in the symbol menu.
- Move the mouse on (or close to) the desired instance axis line, at the desired position. When you have inserted the symbol, you can type the action text.

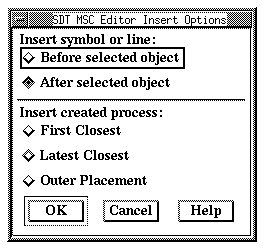
To draw a process create automatically you must first decide on how you want your created instances grouped in relation to the source instance.
The grouping mode allows you to choose how instances of created processes will be placed in relation to the source (or parent) instance. This feature is particularly useful when tracing a simulation in a message sequence chart. You can choose between three different modes:
- First Closest
- Latest Closest
- Outer Placement
You select the grouping mode with the Insert Options dialog in the Edit menu.
Figure 124 : Setting the Insert Options.
-----
(fig)

-----
To draw a process create line:
- Depending on which insert mode you have set, select the object on the source instance axis immediately above (before) or below (after) the place where you wish to draw the process create.
- Double-click the create process line in the symbol menu. The editor draws the create process line and places the instance head according to the insert mode and grouping mode that you have set.
- Terminate by entering the create parameters and the created instance head text fields (see Figure 112 on page 201).
Drawing a process create is done similarly to drawing a message line:
- Click the process create symbol in the symbol menu.
- Move the pointer into the drawing area. The pointer is now displayed as a cross.
- Point at or close to the source instance axis. Click once. From now on, the base of the process create line is fixed to the source instance. The line is displayed as a dashed line, following the mouse motion. It can only be drawn horizontally.
- Point at the location where you wish to place the head of the created instance. Click to automatically draw the instance head and instance axis.
- Terminate by entering the create parameters and the created instance head text fields (see Figure 112 on page 201).

The stop symbol at the end of an instance body indicates the termination of that instance, as opposed to the instance end symbol, which only determines the end of the description of the instance within the MSC.
---------------------------------------------------------------------
Note:
If you position the stop symbol above ("before") a symbol or line on
the instance axis, all symbols and lines below ("after") that object
will be deleted. See Figure 114 on page 204.
---------------------------------------------------------------------
To insert a stop symbol automatically:
- Select an object on the instance axis immediately below (after) or above (before) the desired endpoint, depending on the Insert Mode (see "Insert Options" on page 1334 in chapter 25, The MSC Editor).
- Double-click the stop symbol in the symbol menu.
- In Before selected object mode the selected object and all symbols and lines on the instance axis below it are deleted.
- In After selected object mode all symbols and lines on the instance axis below it are deleted.
- The instance axis line is truncated and is connected to the stop symbol.
To insert a stop symbol manually:
- Position the symbol on (or close to) the desired point of the instance axis line. The instance axis line is truncated and is connected to the stop symbol.

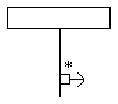
The coregion allows you to specify unordered events on an instance. A coregion covers for instance the practically important case of two or more incoming messages where the ordering of consumption may be interchanged.
To add a coregion symbol:
- Select the coregion symbol in the symbol menu.
- Point with the mouse to the instance axis where to add the symbol. Click once to designate the start point.
- Move the mouse to point to the location where you want the end point (on the same instance axis). Click a second time to designate the end point.
You can move objects on the chart, one object at a time. The way that you do this differs slightly, depending upon the type of object. The various procedures are described below:

The text symbol can be moved freely across the drawing area.
To move a text symbol:
- Point to the text symbol and press the mouse. Move the mouse to the new location and release the mouse. The symbol is redrawn at its new location.
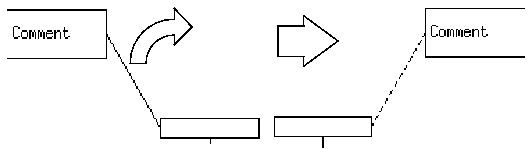
The Comment symbol can be moved freely across the drawing area.
To move a comment symbol:
- Point to the comment symbol and press the mouse. Move the mouse to the new location and release the mouse. The symbol and the line are redrawn accordingly.
- The orientation of the symbol may change and the connecting line is redrawn as required:
Figure 126 : Moving the Comment Symbol.Figure legend: Moving the comment
		symbolas shown in the picture mirror flips the symbol in order to provide the
		shortestpossible connection line.
-----
(fig)


-----
--------------------------------------------------------------------
Note:
If you move the object that the comment symbol is connected to, the
comment symbol moves with it.
--------------------------------------------------------------------

The instance head symbol can be moved horizontally or vertically.
To move an instance head:
- Point to the instance head and press the mouse. Move the mouse to the new location and release the mouse.
- If you induce a horizontal movement, the entire instance axis and the connected objects are redrawn accordingly.
- If you induce a vertical movement, only the instance head is moved. The objects on the instance axis are not affected.
The following restrictions apply when moving an instance head vertically:

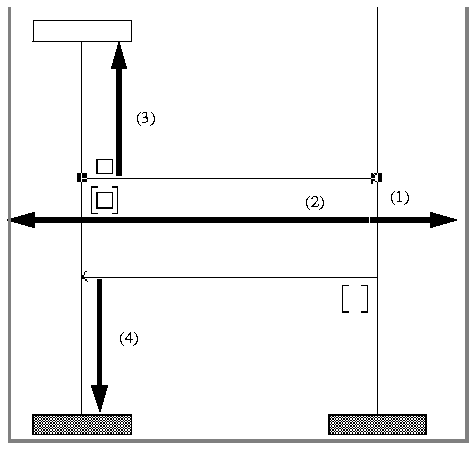
You can move the instance end symbol vertically but not horizontally. (Instead, you move the instance head or the instance axis connected to it.)
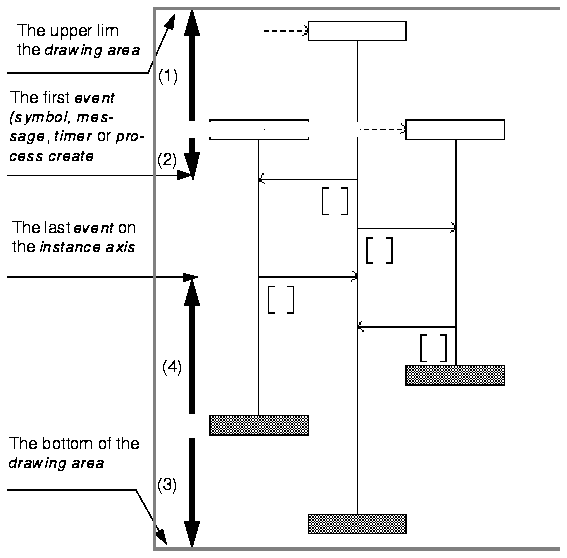
You can move the symbol vertically:
- Down until it reaches the bottom of the drawing area. See (3) in Figure 127.
- Up until it reaches the last event (action, condition, message, timer or process create) that is connected to the instance axis (or reaches the instance head symbol). See (4) in Figure 127 on page 221.
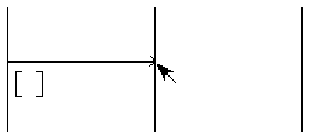
You can move the instance axis line left or right by dragging it with the mouse. All connected messages and process create lines remain connected as they were initially. The instance head and instance end or stop symbols will be moved accordingly. See (1) and (2) in Figure 128.
Figure 128 : Moving Lines
-----
(fig)

-----
To move an instance axis:
- Point to the instance axis and press the mouse. Move the mouse to the new location and release the mouse. The entire instance axis and the connected objects are redrawn accordingly.

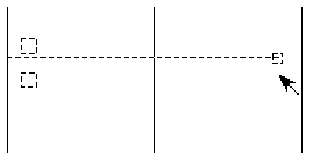
A message can be moved vertically to any position within the limits set by the instance head symbol and the instance end or stop symbol of the source and target instances).
The base and the end of the message remain connected to the original source and target instances. The related message name and message parameters will be moved accordingly. See (3) and (4) in Figure 128.
To move a message:
- Point to the message and press the mouse. Drag the message up or down until it reaches the desired position, then release the mouse. The message and its text attributes are redrawn accordingly.
You can move the base or end of a message up or down along the axis that it is connected to by pointing to and dragging the appropriate (base or end) selection square to the new position. The opposite selection square will remain fixed.
----------------------------------------------------------------
Note:
The end (message input) cannot be moved above the base (message
output).
----------------------------------------------------------------

You can move a messagetoself up or down along its instance axis by dragging it as you would move a message. See "Moving a Message", above.
Use the same procedure as for a message to move the end (message input) or base point (message output) of a message-to-self (see "Moving the Base or End of a Message", above).

You can move the condition symbol vertically along an instance axis to which it is connected; between the instance head and instance end, stop, or the bottom of the drawing area. To connect or disconnect instances to the symbol, use the Connect dialog on the Edit menu.
To move the condition symbol:
- Point to the condition symbol and press the mouse. Move the mouse to the new location on the instance axis and release the mouse. The symbol is redrawn at its new location.

You can move a timer up or down along its instance axis by dragging it as you would move a message. The related timer name and parameters will be moved accordingly. See "Moving a Message", above.
Use the same procedure as for a message to move the end (the time-out or reset arrow) or base point (the set symbol) of a timer (see "Moving the Base or End of a Message", above).

You can move the action symbol vertically along the instance axis between the instance head and instance end, stop or the bottom of the drawing area.
To move the action symbol:
- Point to the action symbol and press the mouse.
- Move the mouse to the new location on the instance axis and release the mouse. The symbol is redrawn at its new location.

To move a process create line along its source instance axis you must move its instance head symbol upwards or downwards. See "Moving an Instance Head Symbol" on page 219
--------------------------------------------------------------
Note:
You cannot move only the dashed process create line. You must
move the instance head.
--------------------------------------------------------------

The stop symbol can be moved according to the same rules as for the instance end symbol. See "Moving an Instance End Symbol" on page 221.

You can move a coregion up or down along its instance axis by dragging it as you would move a message. See "Moving a Message", above.
If you point close to the start or end point of the coregion and start dragging the mouse, the coregion will be resized accordingly.
Some of the objects that are managed by the MSC Editor can be reconnected:

A comment symbol can be reconnected to a different object or disconnected completely from all objects.
To reconnect the comment symbol:
- Select the comment symbol.
- Drag the connection handle towards the new connection point. The existing connection line is erased and a new line that follows the position of the mouse pointer is drawn.
- Once mouse motion has begun, you can release the mouse button.
- Click the connection point on the new object. The connection line is fixed to the new object.
To disconnect the comment symbol:
- Reconnect the symbol to itself.
You can reconnect the base or the end of a message to another instance axis. Proceed as follows (illustrated in Figure 129 and Figure 130 on page 227).
- Point to the base or end of the message.
Figure 129 : Reconnecting a Message (1).
-----
(fig)

-----
- Drag it towards the desired instance axis. As soon as you move the mouse the line is displayed in dashed form.
- When the mouse pointer is close to the new instance axis, release the mouse button. The message is now reconnected.
Figure 130 : Reconnecting a Message (2, 3).
-----
(fig)

-----

You can reconnect the base or end of a message-to-self to another instance axis. This changes the message-to-self to an ordinary message.
- Point to the end (or the base) of the message-to-self.
- Drag it away from the instance axis. As soon as you move the mouse, the line is displayed as a straight dashed line. Continue dragging the end of the line up or down to the new endpoint and release the mouse button.

When you draw a message, the message goes from the source instance to the target instance. It is possible to redirect a message (i.e. change its direction):
- Select the message to redirect.
- Bring down the Edit menu and select the Redirect command. The message is redrawn in the opposite direction, and the text attributes are positioned accordingly, close to the message base.
------------------------------------------------------------------
Note:
Messages-to-self and overtaken messages cannot be redirected (see
Figure 131).
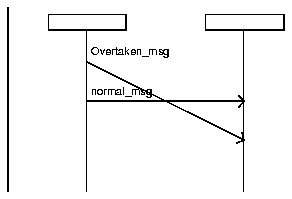
------------------------------------------------------------------
Figure 131 : An Overtaken Message.Figure legend: The figure shows two
		messages.The message which is sent first is consumed after the message which is sent
		last,i.e. it is overtaken.
-----
(fig)


-----

To connect or disconnect instances to the symbol:
- Use the Connect dialog on the Edit menu, see page 1327. (Remember, at least one instance must be left connected.)

You can reconnect the base of a process create from one instance axis to another in a similar way as when reconnecting a message (see "Reconnecting a Message" on page 226).
--------------------------------------------------------------------
Note:
You cannot, however, reconnect the end of the process create line
that is connected to the header of the dynamically created instance.
--------------------------------------------------------------------
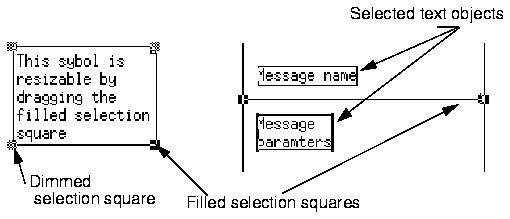
Most of the objects that are managed by the MSC Editor have a fixed size that is assigned by the tool. Some objects can however be resized by the user:

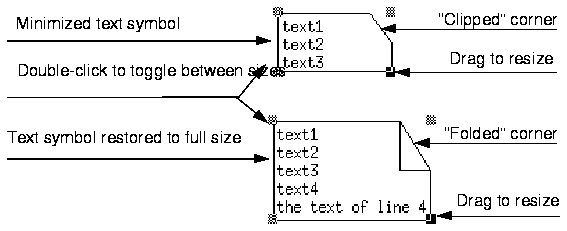
There are two methods of resizing the text and the additional heading symbol:
- Drag the lower right corner of the symbol (marked with a filled -in selection square) until you are satisfied with the new size.
- Double-click the symbol, which causes the symbol to toggle between its minimal and maximal size.
To restore a resized symbol to its full size (where all text is visible), simply double-click the symbol again.
Figure 132 : Minimizing and Resizing a Text or Additional Heading Symbol
-----
(fig)


-----
----------------------------------------------------------------------
Note:
When all of the text within a text symbol is in view, the upper right
corner looks like a piece of paper that has been folded. When any
portion of the text within a text symbol cannot be seen (because the
text symbol is too small), the upper right corner looks like it has
been clipped.
----------------------------------------------------------------------
You can toggle the size of a message, timer and process create parameters between their minimal and maximal size by double-clicking it. The size will be preserved between editor sessions.
When enlarged to its maximal size, the parameters are shown in their whole. When minimized, the MSC Editor will only show the first 10 characters of the first line of text.
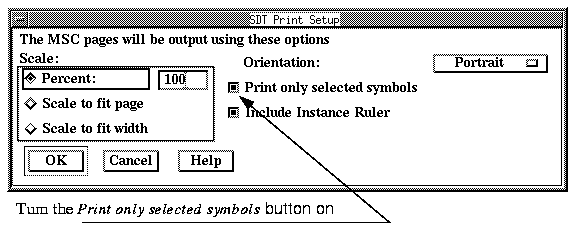
Individual objects can be printed using the Print command.
To print individual symbols:
- Select the objects to be printed.
- Order the Print command from the File menu.
- In the Print Dialog, click the setup button. Click on the Print only selected symbols button button to turn it on.
Figure 133 : Printing Only Selected Objects.
-----
(fig)

-----
- Adjust, if necessary other Print options and terminate by clicking the OK and Print buttons. See "Printing an MSC" on page 176 for more information.
With the MSC Editor's clipboard, you may cut or copy a selection of objects. The selection may then be pasted to the same diagram or to other diagrams.
To cut objects:
- Select the objects.
-----------------------------------------------------------------------
Note:
If you are to cut an Instance head or Instance axis and want to paste
the instance, including the objects that are connected to the instance
(such as messages, timers, actions, conditions and so forth), you
must select all objects of to be pasted.
Selecting the instance only and cutting it will delete its connected
objects.
-----------------------------------------------------------------------
- Select the Cut option from the Edit menu and the selected objects together with their textual attributes are removed from the drawing area and copied to the clipboard awaiting further instruction (typically Paste).
- Alternatively, you can use the right mouse button for selecting and obtaining quick access to the Cut menu choice from the MSC Editor's pop-up menu.
- Select the objects.
----------------------------------------------------------------------
Note:
If you are to copy an Instance head or Instance axis and want to
paste the instance, including the objects that are connected to the in
stance (such as messages, timers, actions, conditions and so forth),
you must select all objects of to be pasted.
----------------------------------------------------------------------
- Select the Copy option from the Edit menu and the selected objects together with their textual attributes are removed from the drawing area and copied to the clipboard awaiting further instruction (typically Paste).
- Alternatively, you can use the right mouse button for selecting and obtaining quick access to the Copy menu choice from the MSC Editor's pop-up menu.
To paste objects:
- Copy or cut the objects to be pasted (see "Cutting Objects" and "Copying Objects" on page 232).
- If required, open the MSC where to paste the objects.
- Select the Paste option from the Edit menu.
- Alternatively, you can use the right mouse button for obtaining quick access to the Paste menu choice from the pop-up menu.
- The clipboard contents appear in the drawing area, displayed in dashed form. Also, a dashed rectangle encloses the selection.
- Move the mouse pointer to a suitable location (the selection follows the mouse motion).
- You may cancel the operation at any time by pressing the <ESC> key.
- Click the mouse. The selection is now pasted.
This page intentionally left blank
Footnotes
- (1)
- For instance, the MSC Editor takes full advantage of the message status when tracing a simulation.
- (2)
- Corresponding in this context means that both conditions refer to the same subset of instances and both conditions agree with respect to name.
Table of Contents  Next Chapter