 Table of Contents
  Previous Chapter 3 Editing MSC Diagrams
The MSC Editor normally stores the MSCs using SDT's binary storage format. You can however save an MSC using the Z.120 MSC-PR format. (MSC-PR can also be read by the MSC Editor, see "Opening an MSC-PR File" on page 169).
Previous Chapter 3 Editing MSC Diagrams
The MSC Editor normally stores the MSCs using SDT's binary storage format. You can however save an MSC using the Z.120 MSC-PR format. (MSC-PR can also be read by the MSC Editor, see "Opening an MSC-PR File" on page 169).
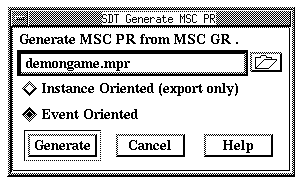
To generate MSC-PR:
- Make sure the MSC currently being displayed is the one you want to generate MSC-PR from.
- Select the Generate MSC PR command from the Edit menu. A dialog is issued:
Figure 134 : Generating MSC-PR.
-----
(fig)

-----
- Specify a file where to store the generated MSC-PR.
- Make sure the Event oriented radio button is turned on.
-----------------------------------------------------------------
Note:  Instance oriented MSC-PR
Instance oriented MSC-PR can only be written by SDT. They can
not be read back into SDT using the current version of the MSC
Editor. (Event-oriented MSC-PR can however be both written and
read back).
You may want to create instance-oriented MSC-PR if the reader or
the tool the file is sent to requires instance oriented MSC-PR.
-----------------------------------------------------------------
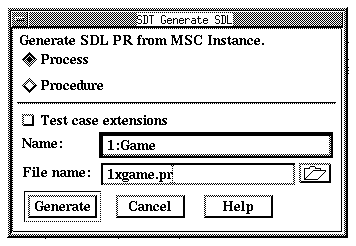
The MSC Editor allows you to produce a stub of an SDL-PR(1) process or procedure description from one MSC instance at the time. The basic intention is to provide a means to reuse MSCs that constitute the specification of the dynamic behavior of a part of an SDL system. For a more detailed description of the translation scheme, see "MSC to SDL Translation Table" on page 1347 in chapter 25, The MSC Editor.
You can also add test cases to the SDL-PR code generated from an MSC; the test cases make it possible to detect that the dynamic behavior of an SDL system does not comply with the originating MSC. See "Test Case Extensions" on page 1348 in chapter 25, The MSC Editor.
To generate SDL-PR code for an instance:
- Select the instance from which you want to produce SDL-PR.
- Operate the Generate SDL command from the Tools menu. A dialog appears:
Figure 135 : Generating SDL-PR from an Instance.
-----
(fig)

-----
- Click the Process or the Procedure radio button, depending on the type of SDL diagram you want to produce.
- Turn the Test Case Extensions button on if you want test cases to be added to the resulting SDL-PR.
- The default name of the SDL process or procedure coincides with the name of the instance. If required, type in a new name.
- Type in the name of the file where to store the resulting SDL-PR.
- Click Generate to order the MSC Editor to produce the SDL-PR file.
- To visualize the results as an SDL-GR diagram, convert the PR file to GR using the Organizer's Convert to GR command.
If you select an object in the MSC Editor window, the text window is updated to contain the text associated with that object. This is explained in detail in "Selecting an Object that has Associated Objects" on page 190.
If you select more than one text object, the text window is not updated.
Each line (exception from the last line) in the text window is terminated by a carriage return, and may consist of any number of legal characters.
The main text editing functions you can do are:
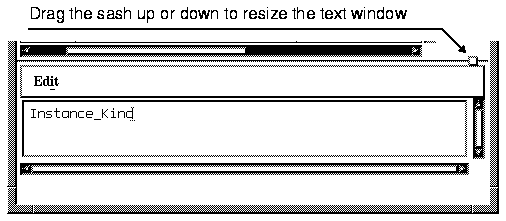
You can resize the text window pane by dragging the sash, the small square at the upper right of the text window, up or down as shown in Figure 136. The smallest possible size makes it impossible to view text within the text area. However, the drawing area will be correspondingly larger. A largest possible size covers the entire MSC Editor window, leaving no room for the drawing area. The text window can only be resized vertically.
Figure 136 : Resizing the Text Window.
-----
(fig)

-----
You can hide and show the text window with the Window Options command from the View menu.
To hide or show the text window:
You can select a portion of text displayed in the text window by performing either of the following sequences of operations:
- Point to the beginning or the end of the portion of text to be selected within the text window.
- Drag the I-beam pointer to the other end of the text to be selected. If the pointer is moved beyond the limit of the text window, the window will automatically scroll. The selected text is highlighted as you move the mouse.
- Release the mouse button.
Figure 137 : Some Selected Text.
-----
(fig)

-----
- Point to the beginning or the end of the text to be selected and click.
- Move the I-beam pointer to the other end of the text to be selected.
- Press <Shift> and click.
You can select a single word, delimited by white space, by double-clicking it.
You can select one line of text by triple-clicking it.
When you alter the content of the text window, both the text window and corresponding text in the drawing area will be updated, the drawing area after a slight time delay.
In addition, any attempt to enter an illegal character will always result in an audible warning.
The standardized text editing functions include:
- Positioning the cursor by clicking, or by using the arrow keys.
- Inserting characters after the current position of the I-beam pointer.
- Deleting the character preceding the I-beam pointer by pressing <Back Space>.
- Deleting the character following the I-beam pointer by pressing <Del>.
- Replacing a portion of text by selecting it and typing the new characters.
- Deleting a portion of text by selecting it and pressing <Back Space> or <Del>. (Remember, the <Del> and the <Back Space> keys have different functions according to Motif style guide.)
You can search for, and possibly replace, text in an MSC diagram or in a number of MSCs that are managed by the Organizer.
To search for text in the current MSC:
- Make sure the window showing the MSC where to search is open and active.
--------------------------------------------------------------------
Note:
2.  Make sure all textual objects that you want to search in are vis
ible (i.e. instance name, instance kind, instance composition,
message name and message parameters). If required, adjust the
Diagram Options.
--------------------------------------------------------------------
- Select the command Show Organizer from the Tools menu. This not only raises the Organizer window but also sets the selection on the diagram currently being edited.
- Select the Search command from the Organizer's Tools menu.
---------------------------------------------------------------------
(fig)
- Alternatively, click the Organizer quick button for Search.
---------------------------------------------------------------------
- Specify the text to be found in the Search for text field.
- Click the Consider case button on to search on a case sensitive basis.
- Make sure the Search MSC Diagrams button is on.
- Click the Search button. The object where the next occurrence of text will be selected and the text window updated accordingly.
- You may use the MSC Editor to edit the contents of a diagram while the Search dialog is active. The Organizer is however locked as long as the Search dialog is open.
- The diagram that the tool is currently processing is displayed to the right of the Diagram field.
- When the Search dialog is no longer needed, close it by clicking Done.
To search and replace text:
- Open the Search dialog as when Searching for Text in an MSC (see above).
- Specify the text to be found in the Search for text field.
- Specify the text to be replaced with in the Replace with text field.
- Click the Search button to find the first occurrence.
- If the text is found, the object where the next occurrence of text will be selected and the text window updated accordingly. You may select from the following options:
- Search further by clicking Search repeatedly
- Replace the text by clicking Replace
- Replace and continue search with the Replace & Search button.
- Replace all occurrences with the Replace All button.
- When the Search dialog is no longer needed, close it by clicking Done.
The text window provides clipboard functions for copying, cutting and pasting text between different symbols, lines and text attributes (these functions do not interfere with the clipboard functions for Cutting, Copying and Pasting Objects).
To copy a portion of text:
- Select the text to be copied (see "Selecting a Portion of Text" on page 239).
- Select the Copy menu choice from the Edit menu of the text window. The selected text is copied to the text clipboard buffer, awaiting further instructions, typically Paste.
To cut a portion of text:
- Select the text to be cut (see "Selecting a Portion of Text" on page 239).
- Select the Cut menu choice from the Edit menu of the text window. The selected text is removed from the text window and is copied to the text clipboard buffer, awaiting further instructions, typically Paste.
To paste a portion of text:
- First copy or cut some text (see "Copying Text" and "Cutting Text", above). You cannot paste any text if the text clipboard is empty.
- Select, if required, the object where to paste the text. Place the I-beam cursor where to paste the text. Any text that is selected in the text window will be replaced when pasting.
- Select the Paste menu choice from the Edit menu of the text window. The contents of the text clipboard are pasted into the text window.
You may change the font faces and font sizes used in the textual objects displayed by the MSC Editor. All textual objects use the same font faces and font sizes, meaning that they cannot be changed individually and cannot be changed during an MSC Editor session.
The font faces which are available depend on the target system on which you are running SDT.
Font management is performed in a similar way as in the SDL Editor. We refer to "Changing Fonts on Text Objects" on page 145 in chapter 2, Editing SDL Diagrams.
The viewport allows you to view a portion of the diagram that you are working on within the MSC Editor. That diagram is currently displayed in the drawing area. Any portion of the diagram located outside the limits of the viewport is out of view, unless you scroll the viewport to display that area.
The MSC Editor uses any scale of your choice when displaying the page in the viewport.
The viewport can be scrolled vertically and horizontally by using the scrollbars.
An automatic scrolling feature is provided. It automatically scrolls the viewport when you move the mouse pointer beyond the current limits of the viewport. This function is activated in following situations:
- When you move an object
- When you append an object
- When you paste an object
- When you reconnect a line
- When you draw a frame around objects in order to select them.
The automatic scrolling function works at two different speeds. If you move the mouse pointer so that it is close to the edge of the viewport, the viewport is scrolled slowly. If you move the mouse pointer outside of the current viewport boundaries, then it is scrolled more quickly. The scrolling stops when you release the mouse button, or move the mouse pointer back into the current viewport.
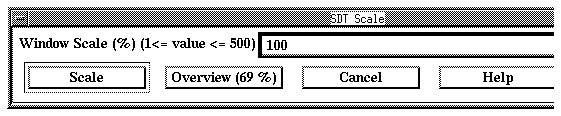
Scaling the view can be done either by specifying a scale to use or by zooming in and out.
To specify a scale:
- Select the Set Scale command from the View menu.
- A dialog is issued, where you have the following options:
Figure 139 : Adjusting the Scale.
-----
(fig)

-----
- Drag the slider to perform coarse adjustments, then click right or left on the slider bar for fine trim. Terminate by clicking the Scale button.
- Click the Overview button to adjust the scale so that the drawing area will fit into the MSC Editor's viewport. The smallest scale is 20%.
To zoom in or out:
This section describes the functionality behind tracing a simulation in a Message Sequence Chart.
The Message Sequence Chart Editor can also used as a graphical trace tool, which enables the automatic generation of a Message Sequence Chart from a simulation. The results of the simulation will be presented in an MSC Editor window, in which each event of interest will be appended to the chart in order to build up a chart which reflects the history of the simulation.
The commands that start up the logging of MSC events, set up the scope of trace, stop the logging of events, and so on, are given to the simulator monitor. See chapter 7, Simulating a System.
First, the scope of trace should, if necessary, be set to the unit which is currently of interest. This is done with the command Set-MSC-Trace.
The graphical trace is then started with a dedicated command from the simulator monitor. See StartInteractiveMSCLog in chapter 32, The Simulator. In response to this command, the following events take place:
- In the Organizer, a reference to a Message Sequence Chart is added. The name is selected in order to guarantee unique names.
- An instance of the Message Sequence Chart Editor window is activated on the newly created MSC.
- The current status for the simulation is presented by displaying all SDL process instances that exist at the time when the command Start-Interactive-MSC-Log is typed.
The mapping rules which govern how SDL events are transformed into MSC symbols, lines and textual elements are summarized in the following table:
---------------------------------------------------
SDL concept MSC Concept
---------------------------------------------------
Signal Message
� Output � Sending
� Input � Consumption
Signal to self Message to self
� Output � Sending
� Input � Consumption
Timer Timer
� Set � Set
� Reset � Reset
� Implicit Reset � Implicit reset(a)
� Input � Time-out
Create a process Process Create
-- Instance End
Stop a process Stop
Environment Environment(b)
System
Instance
<system name> <instance kind>
Substructure
Instance
<system name> <instance kind>
Block
Instance
<block name> <instance kind>
Process
Instance
<process name>
<instance kind>
<instance number> <instance name>
- Coregion
- Sub Message Sequence Chart
State Condition(c)
Task Action(d)
Comment Comment
---------------------------------------------------
- (a)
- See "Implicit Reset" on page 251.
- (b)
- The system's environment is denoted by 1:env
- (c)
- The mapping is only completely valid for a condition connected to only one instance. A condition connected to several instances expresses a logical AND-combination of the states of the processes corresponding to those instances.
- (d)
- The action symbol corresponds to a task symbol containing informal text. This translation is, however, not supported when generating an MSC from a simulation.
When running the simulation, each SDL event of interest (in the scope of MSC Trace) that takes place will cause the corresponding MSC symbol to be drawn immediately in the drawing area of the MSC Editor.
Default layouting algorithms are used. Each event causes the insertion point to be translated downwards with one vertical spacing unit, keeping the intuitive feeling of absolute order between events. An event could be, for instance, the output or the input of an SDL signal. However, if an output event is immediately followed by an input event, no translation will take place.
The Message Sequence Chart Editor will automatically enlarge the MSC size when the MSC has grown so that it reaches the bottom or right of the Drawing Area. The MSC is enlarged according to a preference parameter.
A distinction is made between the reception and the consumption of messages:
- Reception of a message: Once an SDL signal is output in the simulator, it is immediately placed into the input port of the receiving process instance. There may, however, be other pending SDL signals in this queue, which means that the signal might not be input immediately. Therefore, when a signal is output, it is illustrated as received by drawing a horizontal line, marked at its end with an asterisk, from the sending instance to the receiving instance.
- Consumption of a message: When an SDL signal is input, the vertical position for the next event may have moved down in comparison to the position of the signal output. An input of a signal is illustrated by redrawing the line representing the message with its end point connected to the new vertical position. (If an output event is immediately followed by an input, there is no change in vertical position.) The asterisk will also disappear.
- In the case messages remain "asterisk-marked" for a "long" time, this may be interpreted as some kind of erroneous behavior which requires special attention. Messages that are never consumed indicate that some design error might have been introduced in the SDL system. It is up to the user to decide whether the time which has elapsed since a message was sent should be considered as exceeding a reasonable value.
- Each time an SDL process is dynamically created, a process create will be drawn from the source instance axis, and the created instance will be positioned according to the insert and grouping modes that are set. This guarantees that no overlapping instance axes will take place.
- If an instance is stopped (by an stop symbol), the space which becomes available beneath the instance end symbol will not be reused for new instance axes.
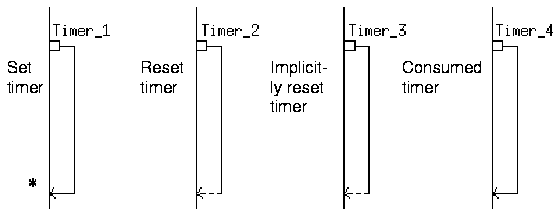
- The Message Sequence Chart Editor can handle four different timer statuses resulting from a simulation:
The implicit reset timer status is a non-ITU addition to the MSC Editor. An implicitly reset timer is immediately set again to its original parameters after reset. It is illustrated in the same way as a reset timer, but the status information is reflected in the Info dialog (see "Requesting Detailed Information on an Object" on page 194).
All interchange of information between the SDL system and its environment is displayed by sending / receiving messages to or from an instance with the name 1:env. This instance is normally placed at the left of the drawing area.
Graphically, in the Message Chart Editor, the concept conditional trace (see "Scope of Trace for Generation of Message Sequence Charts" on page 1831 in chapter 32, The Simulator) is illustrated as sending or receiving messages to / from an instance with the name Void. The purpose of the Void instance is to document that a message exchange actually took place without focusing on the sending / receiving instance.
The ITU recommendation Z.120 allows several ways of using the two text fields Instance Name and Instance Kind. This was discussed earlier in "Adding an Instance Head Symbol" on page 201.
When generating a Message Sequence Chart, the SDL Process Name and the internal instance number managed by the simulator monitor are concatenated to build up one (MSC) Instance Name. The SDL diagram type and diagram name are concatenated to build one Instance Kind.
Example 6 : Instance Name and Instance Kind in Simulation Trace
Assume the simulation program contains an instance of the SDL diagram type = process with the diagram name = Demon and monitor instance number = 2 This would be displayed as the following instance:
Figure 141 : The Use of the Instance Text Fields in a Simulation.
-----
(fig)

-----
Having terminated the trace (either by stopping the simulation or turning the MSC trace off), the user is responsible for saving the Message Sequence Chart(s) that are the results of the simulation.
Footnotes
- (1)
- SDL-PR is the textual form for the Z.100 definition.
- (2)
- The implicit reset concept exists in SDL. It means setting a timer that was already set.
Table of Contents  Next Chapter