 Table of Contents
  Previous Chapter 32 The Simulator
This section describes the appearance and functionality of the graphical user interface to the simulator monitor (SimUI). Some user interface descriptions general to all tools in SDT can be found in the chapter "The SDT Graphical User Interface" on page 1021. These general descriptions are not repeated in this chapter.
Previous Chapter 32 The Simulator
This section describes the appearance and functionality of the graphical user interface to the simulator monitor (SimUI). Some user interface descriptions general to all tools in SDT can be found in the chapter "The SDT Graphical User Interface" on page 1021. These general descriptions are not repeated in this chapter.
A new SimUI is started by selecting the command Simulator UI from the Tools menu in the Organizer. When the SimUI is started, a number of definition files are read, controlling the contents of the main window and some status windows. See "Definition Files" on page 1864 for more information.
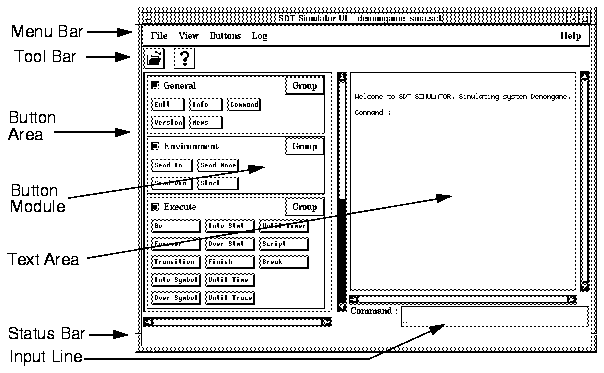
No simulator is started automatically by the SimUI in this way. The user must start a simulator by selecting Open from the File menu, as stated in the text area of the main window (see Figure 510), or by using the Open quick button.
A simple way to generate a simulator, start the SimUI and open the simulator is to click the Simulate quick button in the Organizer.


The main window of the graphical user interface consists of the following parts (see Figure 510):
The text area displays all text output from the monitor system, including user prompts, error messages and command results.
Commands cannot be entered in this area, but a command given on the input line or through the use of the command buttons is echoed after the displayed prompt:
Command :
The input line is used for entering and editing monitor commands from the keyboard. For information on available monitor commands, see "Monitor Commands" on page 1796.
The 100 latest commands entered on the input line are saved in a history list. The history list can be traversed by using the <Up> and <Down> keys on the input line.
When <Return> is pressed anywhere on the input line, the complete string is saved in the history list and is moved to the text area. The command is then executed.
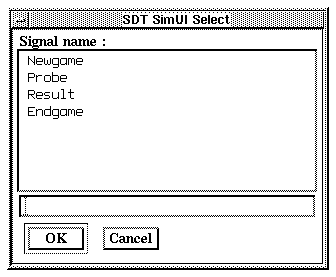
If a command entered on the input line requires additional user input (i.e. parameter values), the information will automatically be prompted for in a dialog:
Each parameter dialog has an OK button for confirming the value and a Cancel button for cancelling the command.
The button area is used for entering monitor commands by clicking the left mouse button on a command button. Each button corresponds to a specific monitor command. The buttons are divided into groups, roughly corresponding to the different types of commands listed in chapter 7, Simulating a System. Each group is shown as a module in the button area. Any number of button modules may reside in the button area. If the modules do not fit in the button area, a vertical scroll bar is added.
The definition of the buttons and button groups are stored in a button definition file (see "Definition Files" on page 1864). New buttons can be added and existing ones deleted or redefined by using the Group menu in a button module.
To examine a button's definition without executing the command, the left mouse button is pressed on the button and the mouse pointer is moved outside the button. The command definition then appears in the status bar, but the command is not executed.
If a button's definition contains parameters, the parameter values are prompted for in dialog boxes before the command is executed, in the same way as described for commands entered from the input line. See "Parameter Dialogs" on page 1841.
When no more parameter values are requested, the string shown on the input line saved in the history list and is moved to the text area. The command is then executed.
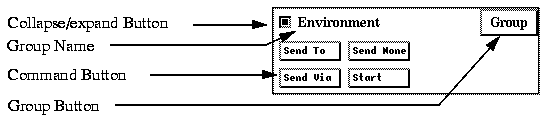
A button module looks like this:
Figure 512 : A Button Module.
-----
(fig)

-----
Each module consists of a title bar and a number of command buttons arranged in rows and columns. The title bar displays:
- A collapse/expand toggle button. Clicking on this button collapses the module so that only the title bar is visible, and expands the module back to its current size so that the buttons become visible.
- The group name of the button module.
- A Group button, providing a menu with commands affecting the buttons in the module.
The Group button contains the following menu items:
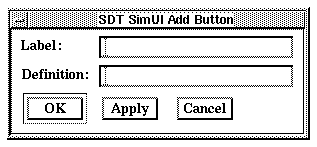
This menu choice adds a new button to the button module. A dialog prompts for the button label and the command to be executed when the button is pressed (see Figure 513). The new button is added to the end of the module. Several buttons may be added with the dialog by using the Apply button instead of the OK button.
Figure 513 : Adding a New Button.
-----
(fig)

-----
For the syntax of a button definition, see the subsection "Button and Menu Definitions" on page 1865.
---------------------------------------------------------------------
Note:
Several buttons are allowed to have the same name within the same
module. When editing the button definition or when deleting the
button, it is always the first occurrence that will be deleted or mod
ified.
---------------------------------------------------------------------
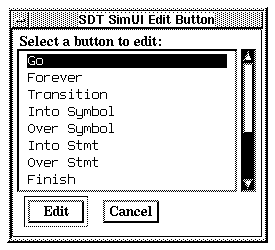
This menu choice edits the label and definition of a button. The button to edit is selected in a dialog (see Figure 514). When a button has been selected, the label and definition can be edited using a dialog similar to Figure 513.
Figure 514 : Editing a Button.
-----
(fig)

-----
----------------------------------------------------------------------
Note:
If several buttons have the same button label, it is always the first
button found that will be edited, independently of the selection.
----------------------------------------------------------------------
This menu choice deletes one or more buttons from the button module. The buttons to be deleted are selected in a dialog (see Figure 515).
Figure 515 : Deleting a Button.
-----
(fig)

-----
----------------------------------------------------------------------
Note:
If several buttons have the same button label, it is always the first
button found that will be deleted, independently of the selection.
----------------------------------------------------------------------
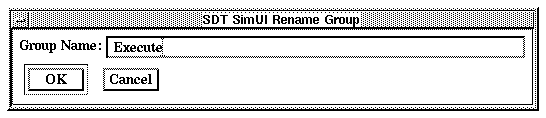
This menu choice edits the name of the current button module in a dialog (see Figure 516).
Figure 516 : Renaming a Module.
-----
(fig)

-----
This menu choice deletes the current module from the button area. A dialog asks for confirmation.
The following tables list the default buttons in the button modules and the corresponding monitor command. See "Monitor Commands" on page 1796 for more information.
----------------------------------------------------------------------
Note:
The buttons in the button modules are specified in the button defini
tion file. If the default button file is not used, the button modules
may be different than described here. See "Button and Menu Defi
nitions" on page 1865 for more information.
----------------------------------------------------------------------
Figure 517 : The General Module.
-----
(fig)

-----
-----------------------------------------------
Button   Monitor command
-----------------------------------------------
Exit     Exit
Version  ShowVersions
Info     Help
News     News
Command  ? (Interactive Context Sensitive Help)
-----------------------------------------------
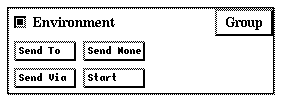
Figure 518 : The Environment Module.
-----
(fig)

-----
--------------------------
Button     Monitor command
--------------------------
Send To    OutputTo
Send Via   OutputVia
Send None  OutputNone
Start      StartSDTEnv
--------------------------
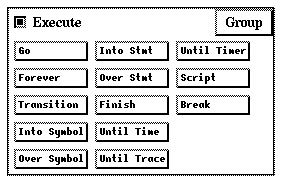
Figure 519 : The Execute Module.
-----
(fig)

-----
------------------------------------
Button       Monitor command
------------------------------------
Go           Go
Forever      GoForever
Transition   NextTransition
Into Symbol  StepSymbol
Over Symbol  NextSymbol
Into Stmt    StepStatement
Over Stmt    NextStatement
Finish       Finish
Until Time   ProceedUntil
Until Trace  NextVisibleTransition
Until Timer  ProceedToTimer
Script       IncludeFile
Break        Pressing <Return>
------------------------------------
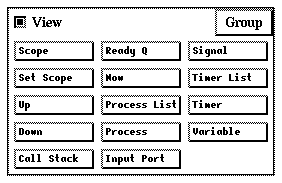
Figure 520 : The View Module.
-----
(fig)

-----
-----------------------------------
Button        Monitor command
-----------------------------------
Scope         Scope
Set Scope     SetScope
Up            Up
Down          Down
Call Stack    Stack
Ready Q       ListReadyQueue
Now           Now
Process List  ListProcess
Process       ExaminePId
Input Port    ListInputPort
Signal        ExamineSignalInstance
Timer List    ListTimer
Timer         ExamineTimerInstance
Variable      ExamineVariable
-----------------------------------
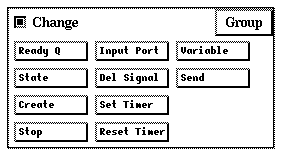
Figure 521 : The Change Module.
-----
(fig)

-----
---------------------------------
Button       Monitor command
---------------------------------
Ready Q      RearrangeReadyQueue
State        Nextstate
Create       Create
Stop         Stop
Input Port   RearrangeInputPort
Del Signal   RemoveSignalInstance
Set Timer    SetTimer
Reset Timer  ResetTimer
Variable     AssignValue
Send         OutputInternal
---------------------------------
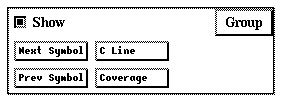
Figure 522 : The Show Module.
-----
(fig)

-----
-------------------------------
Button       Monitor command
-------------------------------
Next Symbol  ShowNextSymbol
Prev Symbol  ShowPreviousSymbol
C Line       ShowCLineNumber
Coverage     PrintCoverageTable
-------------------------------
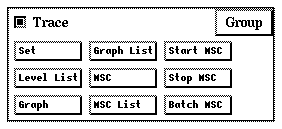
Figure 523 : The Trace Module.
-----
(fig)

-----
----------------------------------
Button      Monitor command
----------------------------------
Set         SetTrace
Level List  ListTraceValues
Graph       SetGRTrace
Graph List  ListGRTraceValues
MSC         SetMSCTrace
MSC List    ListMSCTraceValues
Start MSC   StartInteractiveMSCLog
Stop MSC    StopMSCLog
Batch MSC   StartBatchMSCLog
----------------------------------
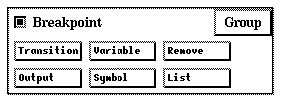
Figure 524 : The Breakpoint Module.
-----
(fig)

-----
--------------------------------
Button      Monitor command
--------------------------------
Transition  BreakpointTransition
Output      BreakpointOutput
Variable    BreakpointVariable
Symbol      BreakpointAt
Remove      RemoveBreakpoint
List        ListBreakpoints
--------------------------------
This section describes the menu bar of the SimUI's Main window and all the available menu choices. However, the Help menu is described in "The Help Menu" on page 1033 in chapter 21, The SDT Graphical User Interface.
The menu bar contains the following menus:
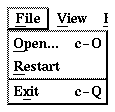
Figure 525 : The File Menu.
-----
(fig)

-----
Starts a new simulator. A Standard File Selection Dialog is opened, in which a .sct file can be selected.
After user confirmation, the currently running simulator is stopped, the Watch window is updated, and the text area is cleared from previously executed commands.
Restart the currently opened simulator. After user confirmation, the currently running simulator is stopped, the Watch window is updated, and the text area is cleared from previously executed commands.
The command is dimmed if no simulator has been opened.
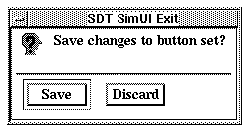
Stops the currently running simulator and exits the SimUI. If there are unsaved changes to the SimUI's definition files, the user is asked whether to save the changes; see Figure 526.
Figure 526 : Saving Changes to Definition Files.
---------------
(fig)(fig)(fig)

---------------
If the Save button is clicked in any of these dialogs, a file selection box will be opened to specify the file name.
For more information on the SimUI's definition files, see "Definition Files" on page 1864.
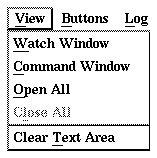
Figure 527 : The View Menu.
-----
(fig)

-----
Opens the Watch window displaying variable values in the simulation. If this window is already opened, the menu item is dimmed. See "The Watch Window" on page 1861 for more information about this window.
Opens the Command window in which arbitrary monitor commands will be executed. If this window is already opened, the menu item is dimmed. See the "The Command Window" on page 1858 for more information about this window.
Opens the Watch and Command windows.
Closes the Watch and Command windows.
Clears the text area in the main window without affecting the simulation.
Figure 528 : The Buttons Menu.
-----
(fig)

-----
For more information on the SimUI's button definition file mentioned in the menu commands below, see "Definition Files" on page 1864.
Reads in a new button definition file that overrides the current button definitions. All buttons and modules currently in the button area are deleted and replaced by the buttons and modules defined in the new file. A Standard File Selection Dialog is opened for specifying the file to load.
Appends the contents of a new button definition file into the current button definitions. Buttons with new labels are added to the button area, while buttons with already existing labels in the same module will be duplicated (possibly with different definitions). A Standard File Selection Dialog is opened for specifying the file to append.
Saves the current button and module definitions in the button definition file under its current file name.
Saves the current button and module definitions in a new button definition file. A Standard File Selection Dialog is opened for specifying the new file name.
Expands all modules in the button area.
Collapses all modules in the button area.
Adds one or more new button module after the last module in the button area. A dialog box is opened for specifying the name of the new module. Several modules may be added with the dialog by using the Apply button instead of the OK button.
Figure 529 : The Log Menu.
-----
(fig)

-----
Start Command Log starts logging of monitor commands only, i.e. each string given to the monitor from the input line and via command buttons will be logged. A Standard File Selection Dialog is opened for specifying the log file. If an already existing log file is selected, the user is asked whether to overwrite this file or to append the log to it (see Figure 530).
Stop Command Log stops the command logging to the file. The appropriate menu choice is displayed depending upon the current state of the log.
Figure 530 : The Create/Append Log Dialog.
-----
(fig)

-----
Start Complete Log starts the logging of complete monitor interaction, i.e. the complete contents of the text area will be logged to a file. A Standard File Selection Dialog is opened for specifying the log file. If an already existing log file is selected, the user is asked whether to overwrite this file or to append the log to it (see Figure 530).
Stop Complete Log stops the complete logging to the file. The appropriate menu choice is displayed depending upon the current state of the log.
Displays the status of the command and complete logs in a dialog box. If a log is active, the name of the log file is shown.
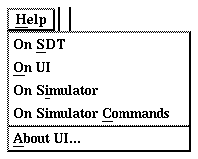
Figure 531 : The Help Menu.
-----
(fig)

-----
In addition to the generic Help menu choices On SDT, On <Tool> and About <Tool>, the SimUI's Help menu has two other menu choices:
Opens the Help Tool with the first page of the User's Guide for the Simulator, i.e., the section "Structure of a Simulator" on page 327.
Opens the Help Tool with a page describing all the commands available in the simulator monitor, i.e., the section "Monitor Commands" on page 1796.
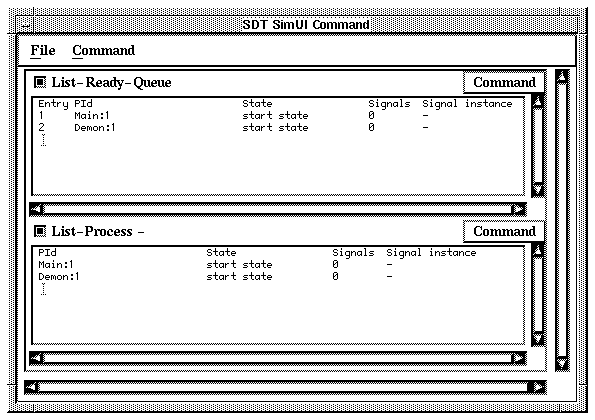
The Command window is an optionally visible window used for displaying the results of executed commands. The Command window is opened from the SimUI's View menu.
Figure 532 : The Command Window.
-----
(fig)

-----
The Command window is updated automatically whenever the monitor becomes active and after each monitor command. See "Activating the Monitor" on page 1786 for information on when the monitor becomes active. The window can also be updated manually with a menu command.
Any number of commands can be defined to be executed in the Command window. Each command is executed in a scrollable module in the window.
New commands can be added to the window and existing commands can be changed. The commands to execute are by default ListProcess and ListReadyQueue. The set of commands to execute are stored in a command definition file (see "Definition Files" on page 1864). The default command definition file can be changed with The Preference Manager.
A command module looks like this:
Figure 533 : A Command Module.
-----
(fig)

-----
Each module consists of a title bar and a scrollable text area for the command output. The title bar displays:
- A collapse/expand toggle button. Clicking this button collapses the module so that only the title bar is visible, and expands the module back to its current size so that the text area becomes visible. When a module is expanded, the text area is automatically updated.
- The command that is executed.
- A Command button, providing a menu with commands affecting the module.
The Command button contains the following menu items:
Opens a dialog for editing the command executed.
Deletes the command and command module from the Command window.
Sets the size of the text area. A dialog is opened where the number of text rows can be set using a slider.
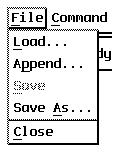
Figure 534 : The File Menu.
-----
(fig)

-----
Reads in a new command definition file that overrides the current command definitions. All commands currently in the Command window are deleted and replaced by the commands defined in the new file. A Standard File Selection Dialog is opened for specifying the file to load.
Appends the contents of a new command definition file into the current command definitions. New commands are added to the command window, but already existing commands are not affected. A Standard File Selection Dialog is opened for specifying the file to append.
------------------------------------------------------------------
Note:
Command names in a command definition file are case sensitive. If
a command in an appended file already exists in the Command win
dow, but with different case, the command will be duplicated.
------------------------------------------------------------------
Saves the current command definitions in the command definition file under its current file name.
Saves the current command definitions in a new command definition file. A Standard File Selection Dialog is opened for specifying the new file name.
Closes the Command window. The commands currently displayed are saved and shown when the window is opened again (through the View menu in the main window).
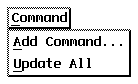
Figure 535 : The Command Menu.
-----
(fig)

-----
Adds a new command to the Command window. A dialog box prompts for the new command. The new command module is added to the bottom of the window. For the syntax of a command definition, see "Command Definitions" on page 1867.
Updates all command modules by executing the defined commands.
The Watch window is an optionally visible window used for displaying values of variables defined in the currently running simulation. The Watch window is opened from the SimUI's View menu.
Figure 536 : The Watch Window.
-----
(fig)

-----
The Watch window is updated automatically after each monitor command. The window can also be updated manually with a menu command.
The variables to display are selected with a menu command. The set of selected variables are stored in a variable definition file (see "Definition Files" on page 1864).
Figure 537 : The File Menu.
-----
(fig)

-----
Reads in a new variable definition file that overrides the current variable definitions. All variables currently in the Watch window are deleted and replaced by the variables defined in the new file. A Standard File Selection Dialog is opened for specifying the file to load.
Appends new variable definitions to the current variable definitions file. The variables in the file are added to the Watch window. A Standard File Selection Dialog is opened for specifying the file to merge. Duplicate variable definitions are permissible.
Saves the current variable definitions in the variable definition file under its current file name.
Saves the current variable definitions in a new variable definition file. A Standard File Selection Dialog is opened for specifying the new file name.
Closes the Watch window. The variables currently displayed are saved and shown when the window is opened again (through the View menu in the main window).
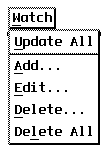
Figure 538 : The Watch Menu.
-----
(fig)

-----
Updates the Watch window by showing the current value of all displayed variables.
Adds one or more variables to the Watch window. A dialog is opened for specifying the variable to be added (see Figure 539). For the syntax of a variable definition, see "Variable Definitions" on page 1867. Several modules may be added with the dialog by using the Apply button instead of the OK button.
Figure 539 : Adding a Variable.
-----
(fig)

-----
Edits a variable specification in the Watch window. The variable whose specification is to be changed is selected in a dialog. When a variable has been selected, the specification can be edited using a dialog similar to Figure 539.
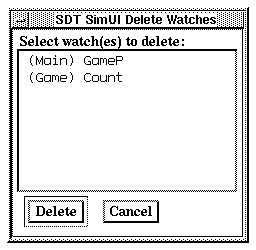
Deletes one or more variables from the Watch window. The variables to delete are selected in a dialog (see Figure 540).
Figure 540 : Deleting a Watch Variable.
-----
(fig)

-----
Deletes all variables from the Watch window.
In the SimUI, the following types of information are stored on files:
- Button definitions
i.e. definitions of button groups and button commands in the main window's button area.
- Menu definitions
i.e. definitions of additional menus and menu commands in the main window's menu bar.
- Command definitions
i.e. definitions of commands to be executed in the Command window.
- Variable definitions
i.e. definitions of variables to display in the Watch window.
At start-up of the SimUI, the files to read are determined in the following way:
- The file names are defined with the The Preference Manager. If a file name is not defined there, the default file name def.btns, def.cmds and def.vars is used, respectively.
- If the file names does not contain a directory path, the files are searched for in the following directories:
- the current directory,
- the user's home directory, and
- the SDT installation directory, in that order.
Once a file has been found, it is read and the contents of the corresponding window are set up. If a file cannot be found, the corresponding window area becomes empty.
Each of three text files can contain comment lines starting with the `#' character. Empty lines are not discarded.
-----------------------------------------------------------------
Note:
When a file is read, no checks are made upon the relevance or cor
rectness of the definitions contained in the file.
-----------------------------------------------------------------
The button and menu definitions are stored in a button definition file with the default extension .btns. The button definitions are divided into groups where each group defines a button module in the main window's button area, or a menu in the main window's menu bar.
In the file, a button group has the following syntax:
:[COLLAPSED] <group name>
<button label>
<definition>
<button label>
<definition>
  . . .
The <group name> is the string shown in the title bar of the button module. If the group name is prefixed with the string COLLAPSED, the button module is initially collapsed. The <button label> is the label of the button in the button module. The <definition> is the monitor command that will be executed when the button is pressed. The syntax of a button definition is the same as when entering a command textually to the monitor.
A menu has the following syntax:
:MENU <menu name>
<menu choice>
<definition>
<menu choice>
<definition>
 . . .
The <menu name> is the name of the menu shown in the menu bar. The <menu choice> is the name of the menu choice in the menu. The <definition> is the monitor command that will be executed when the menu choice is selected.
In the monitor command definition, a `?' as parameter will not work, but a hyphen `-' can be used to signify the default value. Missing parameters at the end of the command will open dialogs for those parameters.
In addition, a button definition may consist of several monitor commands, if they are separated by a space and a semicolon, i.e. " ;". The commands are then executed immediately after each other.
Example 53 : Multiple Commands in Simulator
next-transition ; out-via probe -
This button definition executes the next transition and then sends the signal Probe from the environment.
The command definitions are stored in a command definition file with the default extension .cmds. Each command definition defines a command module in the Command window. The file has the following syntax:
<command>
<command>
  . . .
The <command> is the monitor command that will be executed in the command module. The syntax of a command definition is the same as when entering a command textually to the monitor. All parameter values must be specified explicitly or with the default value `-', i.e. `?' is not allowed, and no parameters may be missing. Command names are case sensitive.
------------------------------------------------------------
Note:
Care should be taken when deciding what command to execute;
commands belonging to the Execute group should be avoided.
------------------------------------------------------------
The variable definitions are stored in a variable definition file with the default extension .vars. Each variable definition defines a variable to display in the Watch window. The file has the following syntax:
(<process>) <variable>
(<process>) <variable>
   . . .
The <process> is the name of the process, possibly augmented with an instance number separated with a space or colon. The <variable> is the name of the variable in that process. Names are not case sensitive.
Example 54 : Variable Definitions in Simulator
(Main) Count
(game:1) guess
There are two restrictions on the monitor input:
- A parameter to a monitor command may not contain more than 5,000 characters.
- Control characters of different types may terminate the simulation program. <ctrlc>, <ctrld>, and <ctrlz> on UNIX are typical characters that might terminate a simulation program.
There are a number of dynamic checks that are not performed at all or performed at the C level by the C runtime system. A C runtime error will of course lead to the simulation program being terminated. The following checks are not made at the SDL level.
- Several paths from a decision for a certain decision expression value. A simulation program will simply choose one of the existing paths.
- Overflow of integer and real values are checked at the C level if the actual C system performs these checks. (These checks are likely not to be performed.)
Table of Contents  Next Chapter