 Table of Contents
  Previous Chapter 6 Verifying a System
Verifying a system means checking that its SDL description obeys the syntax and semantic rules as defined in the Z.100 recommendation (some syntax checking is performed by the SDL Editor at editing time).
The SDT Analyzer tool allows you to perform a complete syntactic and semantic check of an SDL system. This chapter describes the Analyzer and how you may use it to verify an SDL system.
For a reference to the Analyzer commands and the Analyzer functionality and restrictions, see chapter 31, The Analyzer.
The Analyzer's main task is to perform syntactic and semantic analysis of SDL-92 definitions and diagrams. You may perform full syntactic and nearly full semantic analysis of complete system definitions.
Previous Chapter 6 Verifying a System
Verifying a system means checking that its SDL description obeys the syntax and semantic rules as defined in the Z.100 recommendation (some syntax checking is performed by the SDL Editor at editing time).
The SDT Analyzer tool allows you to perform a complete syntactic and semantic check of an SDL system. This chapter describes the Analyzer and how you may use it to verify an SDL system.
For a reference to the Analyzer commands and the Analyzer functionality and restrictions, see chapter 31, The Analyzer.
The Analyzer's main task is to perform syntactic and semantic analysis of SDL-92 definitions and diagrams. You may perform full syntactic and nearly full semantic analysis of complete system definitions.
Analysis of separate units (block, process, substructure, service, and procedure) is also supported.
Syntactic analysis may be performed on a unit, while restricted semantic analysis of a unit may only be performed if the context of the unit is provided. The context is the enclosing units and their definitions (for a detailed description, see the section "Separate Analysis" on page 1562 in chapter 31, The Analyzer).
The Analyzer works in a number of passes:
Figure 156 : Analyzer Passes.
-----
(fig)

-----
- GR to PR conversion. This pass is needed when input is SDL-GR diagrams. The result is a PR file with a "raw" layout, that is submitted as input the next pass. This file is not intended to be read by the human.
- Macro expansion. This pass is needed when input contains references to macros (which need to be expanded). The result is a PR file where SDL macros are expanded.
- Lexical and syntactic analysis. This pass checks that the input follows the SDL definition with respect to syntactic rules. During this pass, the Analyzer builds an abstract syntax tree that is stored in main memory and that is used by the following passes.
- Pretty-printer. This optional pass produces an SDL-PR file with a nice layout, suitable for reading and understanding by the human.
- PR to GR conversion. The input PR files are translated to SDL-GR diagrams, that you may open in an SDL Editor. This pass allows you to for instance import PR files from other tools than SDT.
- Semantic analysis. During this pass, the Analyzer checks that your SDL diagrams obey the semantic rules as defined in the Z.100 recommendation.
- After the semantic analysis pass, you may optionally generate cross-references listings of SDL entities. The result from this pass is a file which contents may be displayed graphically in the Cross Reference Viewer tool.
- If your configuration includes a Code Generator(1) you may include:
- A C Code Generation pass, in order to generate a "C" description of your SDL system. This "C" code is then compiled and linked to generate a simulator, a validator or an application. The C Code Generator is available as a C-Basic and as a C-Advanced code generator.
- A Cmicro Code Generation pass. The generated "C" code is optimized with respect to memory requirements, making it suitable for generating applications for systems with limited resources.
- A CHILL Code Generator pass (generation of CHILL Code for application generations only).
- A CSDL Code Generation pass.
- An X Code Generation pass.
The input to the Analyzer consists of SDL-92 specifications, that is, SDL-GR diagrams that are stored using SDT's storage format, or SDL-PR files, or a combination of both.
The output consists mainly of PR files, error and warning messages. These messages are presented on the screen in a log window and may be stored on file.
It is also possible to obtain a pretty printed SDL-PR file of the input and to transform SDL-PR files into SDL-GR diagrams.
The Analyzer can be run in one of two modes:
When started from the SDT Organizer with the Analyze command, the Analyzer takes advantage of SDT's graphical user interface and integration mechanism.
For instance:
- Graphical references between source documents and error reports is supported, which facilitates locating and correcting errors in the source SDL diagrams.
- An SDL-Make facility, managed by the Organizer, controls the Analyzer and brings down the analysis work that needs to be done.
- On-line help on analysis diagnostics is available (provided the prerequisites for SDT On-Line Help are satisfied).
When started up from the OS prompt, the Analyzer will operate in stand-alone mode. The Analyzer uses the input and output devices currently defined on your computer, which provide a textual, command-line based user interface.
No graphical support is provided when running the Analyzer in this mode.
This section provides additional information about the functionality in the various Analyzer tools.
The GR to PR converter obtains graphical information (SDL-GR) from the Organizer and translates it to text form (SDL-PR). The PR is stored on a text file which is later on read by the parser during the macro expansion or the lexical analysis pass. This PR file is not intended to be read by humans. It is not formatted for that purpose. See "The GR to PR Converter" on page 1557 in chapter 31, The Analyzer in the Reference Manual for a more thorough description.
A number of checks are performed during the GR-PR conversion pass. Many of these are actually syntactic in their nature. They may result in error messages. See "Error and Warning Messages" on page 1579 in chapter 31, The Analyzer.
The Macro Expander reads the input file, replaces all macro calls with the corresponding macro definitions and generates a text file containing the expanded specification. The macro expansion is only necessary if the SDL specification contains macro calls and macro definitions. All macro definitions referenced in macro calls within the specification must be present in the file that is to be expanded. See page 1560 in chapter 31, The Analyzer for a more complete description of the Macro Expander.
The syntax checks made in the macro parser are entirely specific to macros since no other checks are possible prior to expanding all macro calls. Some semantic checks are performed already during the expansion. These may produce error messages. See"Error and Warning Messages" on page 1579 in chapter 31, The Analyzer.
The scanner (lexical analyzer) reads the input file and passes on lexical units to the parser. The parser checks the syntax and builds an internal representation (an abstract syntax tree) for the SDL specification.
The lexical and syntactic analysis may be performed not only on complete system definitions, but also on the following SDL units:
- Block
- Process
- Substructure
- Service
- Procedure
- Package
If no errors are found during the syntactic analysis, the syntax tree can be passed to the pretty-printer and, if the input is a system definition, to the semantic analyzer. Additional description is provided in the sections "The GR to PR Converter" on page 1557 in chapter 31, The Analyzer. For a description of the errors that can produced, see "Error and Warning Messages" on page 1579.
The PR to GR converter transforms SDL phrasal form (SDL-PR) into SDL graphical form (SDL-GR). The result is stored on files which contents can be accessed by and displayed in the SDL Editor. See also section "The PR to GR converter" on page 1564 in chapter 31, The Analyzer and "Automatic Layouting of Diagrams" on page 1269 in chapter 23, The SDL Editor.
The PR to GR converter requires syntactically correct PR files as input.
The semantic analyzer checks that the specification, which must be a system or a package definition, obeys the static semantic rules of SDL. During this analysis phase, the analyzer builds and uses a symbol table which can also be used later on by the Code Generators. The errors that are detected during this pass are described in section "Error and Warning Messages" on page 1579.
As another result of the semantic analysis, reports that contain textual lists of definitions of SDL entities and references to these entities can be produced. These listings hold information about where the entities are defined in an SDL system, and where they are used (referred). Furthermore, they can be processed and displayed by a graphical viewing tool, The Cross Reference Viewer.
The pretty-printer uses the abstract syntax tree to generate a text file containing the SDL specification in pretty printed PR form, easy to read and understand by the human. The generated text file contains the original SDL specification formatted according to the layout rules in the pretty-printer. Macros are expanded however.
The C Code Generator (which may be included in your SDT configuration or not) translates the information produced by the Analyzer into a C program, which can be compiled with a compiler (preferably) supporting ANSI-C. Precompiled libraries are delivered together with the C Code Generator, allowing you to use the generated C code for various purposes, such as simulation of the dynamic behavior of your SDL system, generation of applications on your host computer and generation of applications running on host or target computers.
The C Code Generator is technically a part of the Analyzer's binary file. It is however managed as a separate tool in SDT and its functionality is documented in dedicated chapters in this manual.
The SDL to CHILL Translator, (which may or may not be included in your SDT configuration), translates the information produced by the Analyzer into a CHILL program, which you compile with a CHILL compiler. A precompiled library is delivered together with the CHILL Translator, allowing you to use the generated CHILL Code for generation of applications.
The C Code Generator is technically implemented as a module contained in the Analyzer's binary file. It is however managed as a separate tool in SDT and its functionality is described in chapter 38, The SDL to CHILL Translator.
The Cmicro Code Generator translates your SDL system into an optimized "C" program with a compact code size and highly reduced memory requirements. This is made possible by imposing a few restrictions on the use of SDL. The restrictions are acceptable in the application area, which covers the small to mid-range microcomputer controlled applications.
The Cmicro Code Generator is technically implemented as a module in the Analyzer's binary file. It is however managed as a separate tool in SDT and its functionality is thus described in a dedicated chapter in this manual; see chapter 44, The Cmicro Generator.
The CSDL Code Generator translates your SDL system into a CSDL program that you can use as input to the CSDL tool. The CSDL Code Generator is designed to make it possible to simulate the same SDL system with SDT, that later is translated to an application using CSDL.
The Analyzer is prepared to support additional code generators. The X Code Generator is a generic name for these future extensions.
The X Code Generator has no meaning in a standard SDT configuration.
This section describes how you operate the Analyzer from the Organizer, in an SDT-3 environment. We will discuss topics related to the various ways you may analyze an SDL structure. With SDT, you may for instance perform syntax check on an SDL structure or check an entire SDL system with respect to the semantic rules.
To analyze an SDL structure using default options:
- In the Organizer Diagram Structure area, select the root node for the subtree that is the subject to be input to the Analyzer.
- Click the quick button for Analyze. The Organizer first checks if there are any unsaved diagrams; if any, the Organizer will prompt you to save these before analyzing them (since the Analyzer operates on the latest saved copy of a diagram).

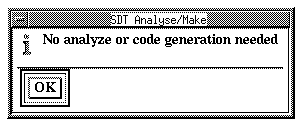
- The Organizer determines what diagrams need to be analyzed and what passes need to be run, by looking at the time the diagrams were saved on file and by monitoring the Analyzer's work. In the case no analysis is needed, you will be informed of this and the operation is cancelled:
Figure 157 : No Analysis is Needed.
-----
(fig)

-----
- To perform an analysis, you may either "touch" the SDL diagram files (this must be done outside SDT) or force the Analyzer by clicking the Full Analyze button (see Figure 158).
- The analysis job is submitted the to the Analyzer, using the options as they are currently defined in the Analyzer options dialog (see Figure 158 on page 312).
- From now on, the status bar reads "Analyzer working". When done, the status bar will read "Analyzer ready".
To analyze an SDL structure with
- In the Organizer Diagram Structure area, select the root node for the subtree that is the subject to be input to the Analyzer.
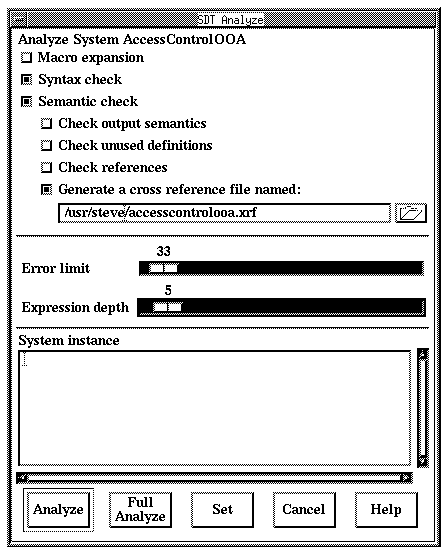
- From the Organizer's Generate menu, select the Analyze command. The Analyzer Options dialog is displayed.
Figure 158 : The Analyzer Dialog.
-----
(fig)

-----
- Adjust, if required, some of the Analyzer options to their required values. These options govern what passes should be performed by the Analyzer, see Figure 156 on page 303, and what output should be produced by the Analyzer. (The code generation pass options are however not controlled from this dialog.)
- Click the Analyze button. First, the Organizer checks if there are any unsaved diagrams; if any, the Organizer will prompt you to save these before analyzing them (since the Analyzer operates on the latest saved copy of a diagram).
- The Organizer determines what diagrams need to be analyzed and what passes need to be run, by looking at the time the diagrams were saved on file and by monitoring the Analyzer's work. In the case no analysis is needed, you will be informed of this and the operation is cancelled:
Figure 159 : No Analysis is Needed.
-----
(fig)

-----
- To perform an analysis, you may either "touch" the SDL diagram files (this must be done outside SDT) or force the Analyzer by clicking the Full Analyze button.
- The Analyzer is initialized and starts executing (this is indicated in the Organizer status bar which now reads "Analyzer working").
- When the Analyzer has analyzed the input as specified in the options, the Organizer status bar reads "Analyzer ready". The results of the analysis are reported in the Organizer log window.
- If the input contains SDL macros, you should expand these before proceeding with the syntax analysis. in the resulting SDL-PR file.
- Turn the Macro expansion button on to order expansion of SDL macros.
- Turn the Syntax check button on to include the syntax checking pass.
- Click the Analyze button.
Turn the Semantic check button on to include the semantic check pass. This option cannot be turned on unless you the Syntax check pass is enabled. The semantic checker may be set up with by a number of options, each one individually activated by a toggle button.
The Check output semantics option controls whether to issue warnings when SDL signal sendings, where the semantics is different in SDL-88 and in SDL-92, are detected. These warnings are particularly valuable when the input consists of SDL diagram that were designed in SDL-88 (for instance with SDT 2.X).
The Check unused definitions option, when turned on, orders the Analyzer to report definitions that are not used (for instance variables that are declared but neither written or read).
When the Check references option is activated, the Analyzer will check that each remote definition is referred only once. Turn this button off to disable this check.
Turn the Generate a cross reference file option on to have the Analyzer generate a file with a list of definitions and references to SDL entities, as an supplementary result from the semantic pass. You may also want to specify another file name than the suggested one. The contents of this file may be read and visualized graphically with the Cross References Viewer tool.
Adjust the Expression depth parameter to specify the depth limit that the Analyzer should check for when evaluating expressions. Expressions which depth exceed the specified limit will be reported. Where possible, try to break down deep expressions since they require advanced calculations and slow down the Analyzer.
Adjust the Error limit parameter to an adequate value (drag the slider for coarse adjustments, click left or right on the bar for fine adjustments). The Analyzer will stop its execution once this error limit has been reached.
You may specify the appropriate definition of the blocks contained in the system you are analyzing.
One definition indicates that a block contains process definitions. The other definition indicates that a block contains a block substructure definition. If a system contains any block with two versions, several system instances exist, and before interpretation a selection between the two versions must be made for each such block in the system.
The System instance field allows you to enter the SDL qualifier of your choice, as illustrated in the following example:
Example 9 : A System Instance
- system MYSYS/block MYBLOCK
This qualifier would result in an interpretation of the block MYBLOCK as containing process definitions.
- system MYSYS/block MYBLOCK/substructure MYSUB
This qualifier would result in an interpretation of the block MYBLOCK as containing a block substructure definition MYSUB. This is the default interpretation.
The results of the Analyzer are appended to the Organizer Log Window. (You may save the window contents on any file at any time). The results of the last run are also saved on a file with the predefined name analyzer.err
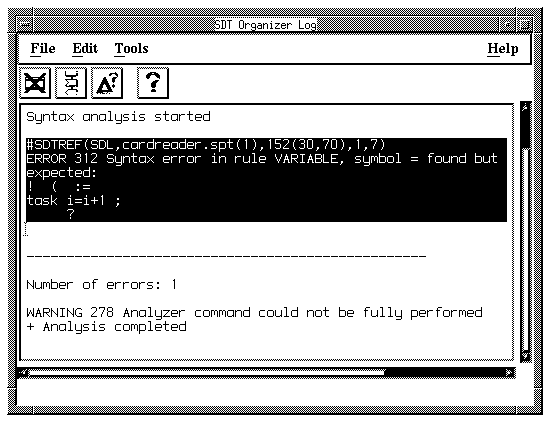
SDT provides a nice feature for displaying the source of an analysis error:
- Locate the Organizer Log window (use the Organizer Log command to raise the log window if required).
- Select the error (or warning) message by dragging the mouse.
Figure 160 : Selecting an Error Message.
-----
(fig)

-----
- The selection must contain at least the line starting with the text #SDTREF (for more information on the format of references used in SDT, see chapter 41, References in SDT-3).
- Select the menu choice Show Error from the Tools menu.
- Alternatively, you may click the quick button for Show Error.

- The symbol where the error has been detected is displayed in an SDL Editor window. When the reference also contains a line and a column reference, the text cursor is placed on the line and column of text where the error was detected.
- If additional explanations are needed to understand the error message, select the Help on Error command from the Tools menu to display the manual page where to read about the error and the probable cause.
- Alternatively, you may click the quick button for Help on Error.

You may produce a pretty-printed PR file with the Analyzer, with a single command. The layout used by this PR makes it easy to read by the human. You may either submit SDL diagrams or SDL-PR files as input to the pretty-printer.
To be able to pretty-print SDL-PR, SDT requires that the input must be syntactically correct. If the input does not fulfil this requirement, SDT will however produce a PR file with a "raw" layout. This file is used by SDT as a temporary file and is does not address the human reader.
- In the Organizer Diagram Structure area, select the root node of the SDL structure to be pretty-printed (this node may be another one than the root node in the Diagram Structure).
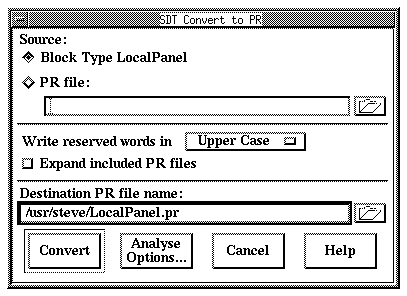
- From the Generate menu, select the Convert to PR menu choice. The Convert to PR dialog is displayed:
Figure 161 : The Convert to PR dialog.
-----
(fig)

-----
- Adjust, if required, the conversion options:
- You may specify a PR file as alternative input. (The default input is the SDL structure designated by the object selected in the Organizer.) To do this, type in the name of a file into the PR file text field.
- You may order the Analyzer to capitalize SDL reserved words or not; select the appropriate option from the Write reserved words in option menu.
- If the SDL structure contains #INCLUDE references to SDL-PR files, you may want to expand these and include them in the resulting pretty-printed PR file. Turn the Expand included PR files button on to order expansion of included PR files.
- An output file where the resulting SDL-PR code will be stored is suggested. You may specify any other file to store the results on in the Destination PR file name text field.
- If the input contains SDL macros, you may want to expand these in the resulting SDL-PR file.
- Click the Analyze Options button to gain access to the Analyzer options dialog, where you turn the Macro expansion button on and click the Set button.
- Click the Convert button to close the dialog and have the Analyzer start the conversion to SDL-PR.
You may convert SDL-PR files to SDL-GR diagrams, storing them on files using SDT's native format. Once converted, these SDL descriptions may be managed, edited and printed by SDT's graphical tools as if they were created using SDT.
To convert an SDL-PR file to SDL-GR diagrams:
- From the Organizer's Generate menu, select the command Convert to GR. A dialog is displayed:
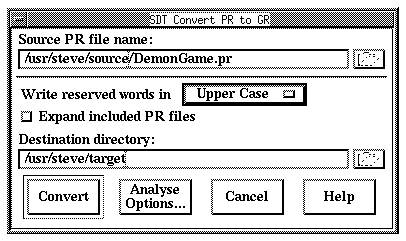
Figure 162 : The Convert PR to GR Dialog.
-----
(fig)

-----
- Specify the PR file to convert from. You may either type the file specifier or click the folder button to issue a Standard File Selection Dialog.
- Specify the destination directory, where to store the results of the conversion. You may either type the name of a directory or click the folder button to issue a directory selection dialog.
- You may specify other options:
- Whether to capitalize SDL reserved words or not, by selecting the corresponding option from the option menu.
- Whether to expand any included PR files or not (PR files are included using a #INCLUDE directive inside an SDL comment statement).
- If required, click the Analyze Options button to modify the Analyze options (typically, you may need to turn the Macro Expansion option on). Close the Analyze Options dialog with the Set button (see Figure 158 on page 312).
- Click the Convert button to order the conversion. The Organizer's status bar reads "Analyzer ready" when the conversion is completed.
- To look at the resulting diagrams, you may either open the resulting files in the SDL Editor.
In SDT-2, the Analyzer options were stored on dedicated Analyzer options files (the files with the default file extension .san). In SDT-3, the Analyzer options are stored on a System File.
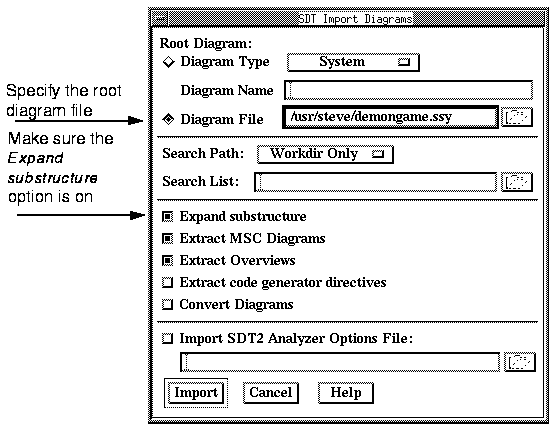
When you familiarized yourself with SDT-3, it is likely that you (or one of your colleagues) did import SDT-2 diagrams to build an SDL structure that can be managed by the Organizer.
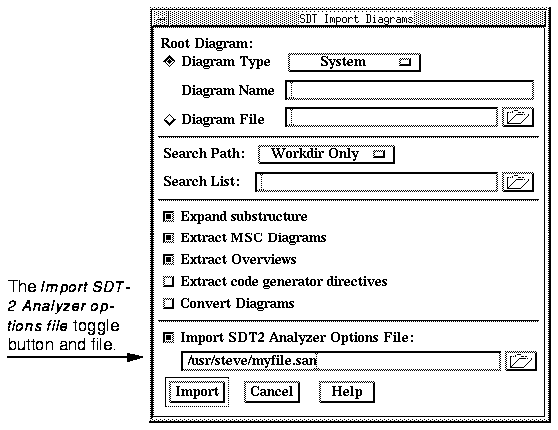
When importing diagrams into the Organizer, an option, titled Import SDT-2 Analyzer options file controls whether or not to import (when applicable) the contents of an SDT-2 Analyzer options file into a system file.
Figure 164
-----
(fig)

-----
- Turn the Import SDT-2 Analyzer options file toggle button on and type in the name of the file.
------------------------------------------------------------------
Note:
Importing Analyzer options files must be done in conjunction to im
porting the SDL diagrams. You cannot import Analyzer files into
an existing SDT-3 diagram structure, without affecting the system
file.
------------------------------------------------------------------
Footnotes
- (1)
- Although technically built into the Analyzer binary executable (sdtsan), the Code Generators are additional optional tools that are licensed separately.
- (2)
- CSDL is a trademark of Italtel. The CSDL Code Generator is not available in standard SDT configurations and is just mentioned for the sake of completeness.
Table of Contents  Next Chapter