 Table of ContentsTable of Contents
  Previous Chapter
 The second example uses the Service Encapsulator and shows the usage of some SDT Services.
The third example exemplifies how to integrate an SDT simulator and a separate user interface. How to design such a user interface, especially by using TeleUSE (R) , is described in a detailed example.
It is assumed that the reader has experience of creating and running SDT simulators. Parts dealing with graphical user interfaces assume experience of using TeleUSE (R) .
The purpose of this example is to show
From the outside world the application behaves like a tool providing remote procedure call functionality. That is, when the service is requested, the application synchronously waits for the service reply, before returning (the application exits).
The example is found in the SDT distribution in the sub directory examples/services.
The tool connects to the PostMaster by issuing:
SPInit(SET_EXTERN, argv[0], spMList)The first parameter gives the type of application. In this case SET_EXTERN is used. This application type is a predefined tool type for external applications connecting to SDT. The variable spMList gives the possibility to convert between textual (symbolic) values and integers.
If SPInit succeeds, SPinit broadcasts a SESTARTNOTIFY, indicating to all other tools in the environment that an additional tool is connected.
   if ((tool=atoi(argv[1])) == 0 )
     tool = SP(argv[1]);
If the parameter <tool> was given textually, the function SP converts it to the corresponding integer value. If a mapping cannot be found, -1 is returned and we exit the application.
if ((sendEvent=atoi(argv[2])) == 0 )
   if ((sendEvent = SP(argv[2])) == -1 ) {
      printf{"No such service\n");
      exit(1);
   }
The macro SP_ISREQUEST returns true if the issued message is of service request format.
if ( ! SP_ISREQUEST(sendEvent) ) {
   printf("Not a service\n");
   exit(1);
}
The tool provides a simple support for the create attribute and the update attribute services. These services are special since they make use of binary data. Even ASCII based data must be converted to binary. The conversion done in the tool only works for simple examples. Real application using these services, should be programmed in C.
We know that the ninth parameter contains the data part, which is to be converted. Its' length is calculated and appended to the string to be sent followed by a terminating ASCII 0. Then immediately following the terminating ASCII 0 the characters in data is put using memcpy.
sprintf(s, "%d", strlen( argv[9]) );
strcat(p, s);
memcpy((char *)p+strlen(p)+1, argv[9],
        strlen(argv[9]));
status = SPSendToTool(tool, sendEvent, p,
                      strlen(p)+1+strlen(argv[9]));
A normal service request is issued by:
for (i=3; i<argc; i++) {
   strcat(p, argv[i]);
   strcat(p , " ");
}
status=SPSendToTool(tool, sendEvent, p, strlen(p)+1;
The last parameter tells the length of the parameter provided by argv[3] and must be extended by 1 to include the terminating \0 character.Now the service request message is sent to the PostMaster which forwards it to the server application. If not busy the Service application starts to process the service request and when finished it replies with a service reply message to the issues. However, during the processing other messages can be sent or broadcasted to the Service Encapsulator (the service issuer). Therefor we must enter a loop where we stay until the reply message is received. Other kind of messages are dropped.
do {
   if (( status=SPRead(SPWAITFOREVER, &pid,
         &replyEvent,(void*)&replyMessage, &len))!=0 )
      OnError("Error reading from postmaster: ");
} while ( ! SP_MATCHREPLY(sendEvent, replyEvent) );
The function SPRead reads a message form the PostMaster. The first parameter, the timeout, could be set to wait indefinitely until a message arrives, using the value SPWAITFOREVER. This simple application has a drawback, that if something unexpectedly happen to the server, it might be that no service reply will be sent which means that we block in SPRead forever. The behavior could be enhanced by setting a timeout, and when the timeout expires, check the state of the server (Use the PostMaster service Get Tool Pid,).
If the service readattribute was issued, special care must be taken to handle the answer, since it contains binary data. The length of the data part ends the replyMessage. The end is indicated by an ASCII 0. The data part immediately follows the ASCII 0 character and might contain non-ASCII characters. Our printout assumes ASCII data.
if ( sendEvent == SEREADATTRIBUTE ) {
   printf("%s", replyMessage+1);
   printf("%s\n", replyMessage+ strlen(replyMessage)
          +1);
}
The macro SP_MATCHREPLY, compares the issued service request message and the reply message and returns true if the correct received message was the correct service reply message.
free (replyMessage);replyMessage was dynamically allocated using malloc in SPRead, so it must be freed.
Before terminating the application notify all other applications in the environment that it is going to break its' connection to the PostMaster
SPBroadcast(SESTOPNOTIFY, NULL, 0);Finally we exit calling the function.
SPExit ();
cd $sdtrelease/examples/services
setenv sdtdir <platform>sdtdir
make
ServiceEncapsulator <tool> <service> <parameters>*where
<tool>
is the tool that should perform the service, and
<service>
is the service itself.
<parameters>
If the service takes parameters, these should be provided as additional parameters.
The parameters <tool> and <service> could either be given as their identifying integer number or textually. See file sdt.h for definitions. The variable spMList in this file provides list of textual mappings.
In these examples, we only use textual values of the parameters <tool> and <service>. Available textual values is found in the spMList variable in sdt.h.
In the examples below, the Service Encapsulator is executed from a csh shell. If another shell is used, the examples below might need to be modified in order to supply the parameters correctly. Take care how to supply the quoted strings.
Requesting the service. It is assumed that a file a.pr is to be loaded. Note that the file to be loaded must be specified with a full directory path.
ServiceEncapsulator info loaddefinition /usr/ab/a.prIf the Information Server is started, the following reply message is returned:
Reply status is OKIf the Information Server is not started, we get the following reply message.
Error sending to postmaster:  server not connected to
postmaster
ServiceEncapsulator sdle obtainsourceIf the editor was already started and there was a selection the reply message might look like:
Reply status is OK
 1 "#SDTREF(SDL,/usr/sdt-inst/sdt3/examples/simula
tor-integration/sunos4/demon.spr(1),125(30, 70))"
Note that the reference returns a complete file path of the diagram file in which the selection was made.
If the editor did not contain any selection the reply becomes:
Reply status is OK
0
For a complete description of the service, see "Obtain GR Reference" on page 2534 in chapter 43, The SDT Public Interface.
To test this service we could now deselect all selections in the SDL editor and use the reference extracted by obtainsource to select this symbol again. Note how the SDT reference is quoted to pass it from the shell into the tool.
ServiceEncapsulator organizer showsource \
  """#SDTREF(SDL,/usr/sdt-inst/examples/simulator- \
  integration/sunos4/demon.spr(1),125(30,70))"""
If the reference is found the following message is replied:
Reply status is OKFor a complete description of the service, see "Show SDT Source" on page 2529 in chapter 43, The SDT Public Interface.
For a complete description of how to specify a SDT reference, see "Syntax" on page 2476 in chapter 41, References in SDT-3.
For a complete description of the services, see "Add Menu" on page 2547, "Delete Menu" on page 2548, "Clear Menu" on page 2548 and "Add Item to Menu" on page 2549 in chapter 43, The SDT Public Interface.
Add a new menu to the SDL editor:
ServiceEncapsulator sdle menuadd \"dyn-menu\"Reply:
Reply status is OKAdd a menu item which executes the OS command ls after a confirmation from the user:
ServiceEncapsulator sdle menuadditem  \
\"dyn-menu\" \"ls\" 0 \
\"Perform OS command ls\"  0 0 0 \
\"OK to perform ls!\" 1 1 \"ls\"
Reply:
Reply status is OKThen a menu item is added displaying the SDT reference of the selected symbol on standard output.
ServiceEncapsulator sdle menuadditem  \
\"dyn-menu\" \"SDT-ref\" 1 \
\"export SDT ref\"  0 0 1 \
\"\" 1 1 \"echo \'%g\'\"
Reply:
Reply status is OKNote that only dimmed if more than one item is selected. Normally a selected symbols includes a selection of in-going and out-going flowlines. These flowlines must be de-selected in order to get the SDT reference of the symbol
Finally display the file containing the selected symbol on standard output.
ServiceEncapsulator sdle menuadditem  \
\"dyn-menu\" \"filename\" 0 \
\"export filename\"  0 0 1 \
\"\" 1 1 \"ls -ls %a\"
Reply:
Reply status is OK
An description of extended attributes are found in "Extended Data Attribute" on page 2554 in chapter 43, The SDT Public Interface. Extended attributes are handled as binary data by SDT. As such, their services are preferably accessed via C program interface, in which binary data is easily handled.
However, in this example extended attribute services are accessed via the Service Encapsulator, which works for simple examples.
The example assumes one selection in an SDL editor. This reference is saved in a shell variable
set sel=`ServiceEncapsulator sdle obtainsource`If we have exactly one selection, we set the extended attribute. Parameter 5 in sel will tell us the number of selections. Parameter 6 in sel will give us the selection.
ServiceEncapsulator sdle createattribute 0 0 $ref 0 \
  \"myComment\" \"\" MyData
Note that no length of data (MyData) is provided. The Service Encapsulator recognizes the service createattribute and calculates the length of data.
We get the reply:
Reply status is OKNow we extract the extended attribute on the selection.
ServiceEncapsulator sdle readattribute 0 0 $refWhich replies:
Reply status is OK
0 "myComment" "" 6MyData
Note that data immediately follows its' length without any spaces. In the reply message, there is a ASCII 0 character after the length, proceeding the data part.
Then we update the attribute by;
ServiceEncapsulator sdle updateattribute 0 0 $ref 0
\"newComment\" \"\" NewData
Reply:
Reply status is OKThe Service Encapsulator also recognizes the update attribute service and calculates the length of data.
Finally we read the extended attribute and should receive the updated value.
ServiceEncapsulator sdle readattribute 0 0 $refWhich replies:
Reply status is OK
0 "NewComment" "" 7NewData
The script extended-attributes performs the above described actions.
The communication between an SDT simulator and another application is handled by the PostMaster, and can be seen as occurring on two levels:
To ensure successful communication with an SDT simulator, the SDL signal interface to the environment should be designed with regard to the connected applications. Decisions made when designing a UI can influence the design of the simulator interface, and vice versa. It is important to have a clearly defined signal interface to the applications that will communicate with the simulator.
Each tool designed to communicate by using SDL signals must have an interface to the PostMaster that handles the transformation to and from an appropriate message.
In the case of an SDT simulator, this interface is generated automatically by SDT. To invoke the transformation, so that SDL signals to and from the environment are transferred using the PostMaster, the monitor command StartSDTEnv is to be used.
For other tools, the interface to the PostMaster must be implemented separately. The interface must use functions described later in this appendix to connect to the PostMaster, and to send and receive PostMaster messages containing SDL signals. This includes packing the information contained in the SDL signal (name and parameters) so that it can be sent using a PostMaster message, and unpacking the same information of a received message. See "Input and Output of Data Types" on page 1792 in chapter 32, The Simulator for more information on suitable data formats.
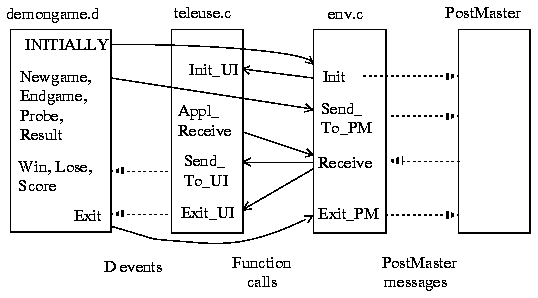
The DemonGame simulator is connected through the PostMaster to a control program, consisting of two parts; an interface to the PostMaster and a user interface (see Figure 190).
The PostMaster interface establishes a connection to the PostMaster and communicates with the DemonGame simulator. Messages are sent via the PostMaster to the simulator where they are seen as SDL signals coming from the environment. Correspondingly, SDL signals to the environment are sent via the PostMaster as messages back to the PostMaster interface.
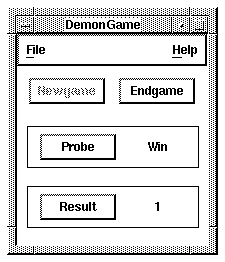
The UI facilitates sending and receiving of the SDL signals sent to and from the environment in the Demon game. Both a command-based UI (written in C) and a graphical UI (X Windows/Motif based, developed with TeleUSE) are implemented. The UI must be able to forward the SDL signals Newgame, Endgame, Probe and Result, and to present the SDL signals Win, Lose and Score.
Figure 190 : System parts and their communication.
-----
(fig)

-----
-------------------------------------------------------------------
Note:
The simulator and the control program have the same communica
tion interface to the PostMaster. The simulator's interface to the
PostMaster is generated automatically by SDT.
-------------------------------------------------------------------
Some general rules on how to design the code of a PostMaster client can be found in "Designing PostMaster Clients by Using TeleUSE" on page 511.
All C functions, C preprocessor symbols and PostMaster messages used in this example are described in "PostMaster Reference" on page 2484 in chapter 42, The SDT PostMaster.
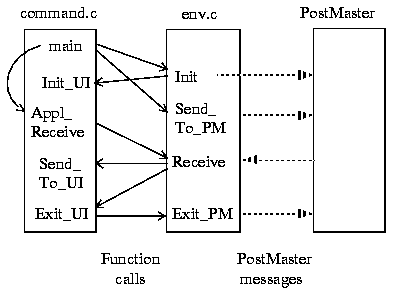
The C program for the command-based UI is called command.c. It contains the functions:
------------------------------------------------------------------
Note:
The version of TeleUSE supported in this example is v2.0.5. You
may have to change the code if another version of TeleUSE is used.
------------------------------------------------------------------
A button is only sensitive when it is meaningful to send the SDL signal. The score field is cleared whenever Probe is pushed.
Figure 191 : Graphical UI.
-----
(fig)

-----
The code for the graphical UI consists of the following:
Exit is sent by the menu item Exit. It calls Exit_PM in the PostMaster interface, and exits the UI and the application.
HelpWindow is sent by the menu item On Window, and HelpOK is sent by the OK button in the help window. They manage/unmanage the help window.
Clear is sent by the INITIALLY, Newgame and Probe rules. It clears the result and score fields.
Newgame, Endgame, Probe and Result are sent by the respective buttons. They send the corresponding SDL signal by calling Send_To_PM in the PostMaster interface.
Newgame and Endgame also changes the sensitivity of the buttons.
Win, Lose and Score are sent by Send_To_UI in the UI. They update the result and score fields.
Init_UI registers the PostMaster message port as a source of events for the X Intrinsics, and sets Appl_Receive as the callback procedure to call.
Exit_UI calls Send_To_UI to send the D event Exit.
Send_To_UI sends the D event corresponding to the received signal.
Figure 192 : Communication diagram (GUI-based).
-----
(fig)

-----
Figure 193 : Communication diagram (command-based).
-----
(fig)

-----
The tools are provided in source code form and in binary form for the architecture on which you have purchased SDT.
For the example program to execute correctly, this error must be corrected. New diagrams for the block GameBlock (gameblock.sbk) and the process Main (main.spr) are therefore provided, and are to be used to generate a new simulator. You can find the necessary files in the directory named examples/simulator-integration.
All communication with the PostMaster should be made through C functions which in turn call the PostMaster functions. You should implement separate functions for initializing and exiting the connection to the PostMaster, and for sending and receiving PostMaster messages. These C functions should then be called from appropriate places in the UI, either as widget callbacks or, preferably, from the D code.
Errors in the PostMaster communication are detected in the C functions, but handling of user notification should be made in the UI. This is preferably accomplished by sending a D event to the dialog by calling TeleUSE runtime functions. The D event could carry information such as an error message and the PostMaster error code, which is then appropriately displayed, for instance in a popup dialog.
The initialization function should call SPInit. The exit function should broadcast the message SESTOPNOTIFY and call SPExit.
Sending messages is quite straightforward, but receiving messages needs some special attention. To be able to listen to the PostMaster message port for incoming messages, the port must be registered as a source of events for the X Intrinsics. This is accomplished with a call to XtAppAddInput, supplying the port number from SPInit and a callback function. This initialization must be made early in the application, preferably in the INITIALLY rule in the D code.
The callback function should read the incoming message and act upon it. The action could be to send a D event to the dialog that handles the message, in which case the message handling is asynchronous. Alternatively, if a message is expected as the response to a previously sent message, the function used for sending the outgoing message could wait for the expected incoming message and then return to the caller. In this case the message handling is synchronous. You should be aware that this could lead to situations where the UI seems to hang, if the incoming message is not received within an expected or acceptable amount of time.
In general, asynchronous message handling is preferred.
 Next Chapter