 Table of Contents
  Previous Chapter 4 Tutorial: An SDL-92 Example
This is a tutorial on how to use the new Object Oriented features in SDL-92. It assumes that you are already familiar with SDL and have a basic knowledge of how to work with the SDT 3.02 tools.
We recommend newcomers to acquaintance themselves with the basic features of the SDT tool by first practising on the exercises that are provided in chapter 3, Tutorial: A First Example, before practising the examples in this chapter.
Starting-point in this tutorial is the result from a preliminary OOA analysis (for more information on the OOA analysis phase see chapter 1, Object-Oriented Design Using SDL-92, in the volume SDT 3.02 Methodology). The application is the simple and well known AccessControl system.
The OO concepts will be introduced step by step by creating different (complete) versions of the application, and it is possible to start the tutorial from any level.
The AccessControl system is a system to control the access of a building. To enter, a user must have a registered card and a personal code (four digits). The system can be setup to control from 1 to 4 doors (the default is only 1 door). To facilitate a simple and realistic simulation an X Window System user interface is provided, see Figure 151.
Previous Chapter 4 Tutorial: An SDL-92 Example
This is a tutorial on how to use the new Object Oriented features in SDL-92. It assumes that you are already familiar with SDL and have a basic knowledge of how to work with the SDT 3.02 tools.
We recommend newcomers to acquaintance themselves with the basic features of the SDT tool by first practising on the exercises that are provided in chapter 3, Tutorial: A First Example, before practising the examples in this chapter.
Starting-point in this tutorial is the result from a preliminary OOA analysis (for more information on the OOA analysis phase see chapter 1, Object-Oriented Design Using SDL-92, in the volume SDT 3.02 Methodology). The application is the simple and well known AccessControl system.
The OO concepts will be introduced step by step by creating different (complete) versions of the application, and it is possible to start the tutorial from any level.
The AccessControl system is a system to control the access of a building. To enter, a user must have a registered card and a personal code (four digits). The system can be setup to control from 1 to 4 doors (the default is only 1 door). To facilitate a simple and realistic simulation an X Window System user interface is provided, see Figure 151.
Figure\x11 151 : The X Window System UI.
-----
(fig)

-----
- The square boxes, numbered from 1 to 8 is representing the status of the doors (marked = open, unmarked = closed).
- To simulate a card input - press one of the two card buttons (American Express or Visa).
- Messages from the application (reception of the SDL signal Display) are shown in the display window.
The following default functions are implemented in version 1 and version 2.
The two following additional functions are implemented in version 3.
- Display of time
- Set time function.
The specialization and virtual concepts of SDL-92 will be used to implement the additional functions, by adding and redefining properties of the default version.
The intention of creating different versions of the AccessControl system is to introduce the SDL-92 concepts step-by-step. Each version will be complete and self contained and can be fully analyzed and simulated.
This version will implement the default functions. The only OO concepts in SDL-92 used in this version are block types and process types.
It is only the default functions that are implemented. The function and the name of the procedures are the same as in version 1, but here they are defined as remote procedures and/or value returning procedures. Three procedures are moved to other processes and are called as remote procedures.
The additional functions (Display of Time and SetTime) are implemented. The starting-point is to make a system type of the default version. In a specialization and redefinition of the system type are the properties of default version changed, by adding and redefining blocks/processes.
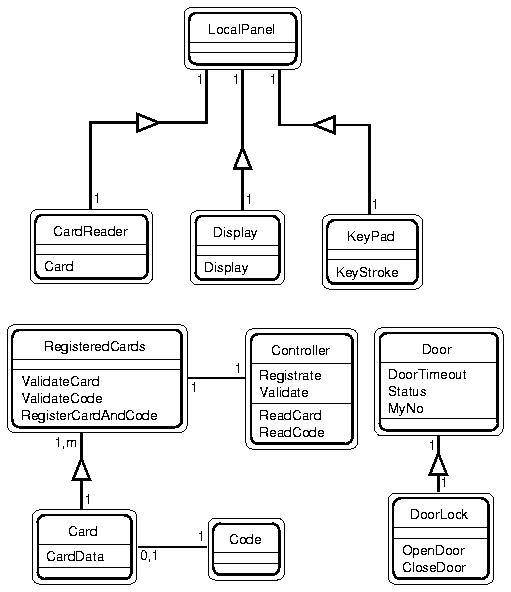
The steps in an OOA analysis is to first find the candidates for classes/Instances and then analyze the relationships between them from different perspectives. The relationships looked for are: inheritance (general/specialization structures), close relations and cardinality between classes (whole/part of structures) and close relations between instances (instance connection). In the first version we have not used inheritance, so the only structures are whole/part of and instance connections (see Figure 152).
Figure\x11 152 : The Result of the OO Analysis.
-----
(fig)

-----
The three text fields in a class symbol are used for specifying:
- The name of the class
- The attributes (data) of the class
- The services (methods) of the class.
The principal rule is to map a class to a process type in SDL. A whole / part of structure is often mapped to a block and process structure. If a class is mainly representing data and the services are representing data operations, then the class is best mapped to an abstract data type (ADT).
-------------------------------------------------------------------
AccessControl -OOA     AccessControl - SDL-92
-------------------------------------------------------------------
Class LocalPanel       Block type LocalPanel (will contain
                       instances of process type: CardReader,
                       Display, KeyPad and Controller)
Class CardReader       Process type CardReader, defined on
                       system level.
Class Display          Process type KeyPad, defined on system
                       level.
Class Controller       Process type Controller, defined on system
                       level. In the OOA analysis this class was
                       found to have an instance connection with
                       the class RegisteredCard but from the com
                       munication point of view it is more related
                       to the class LocalPanel.
Class RegisteredCards  Process type RegisteredCard instantiated in
                       a block type RegisteredCard.
Class Card and class   An ADT defined on system level and
Code                   instantiated in the process type
                       RegisteredCard.
Class Door and class   Process types, instantiated in a block type
DoorLock               Doors.
-------------------------------------------------------------------
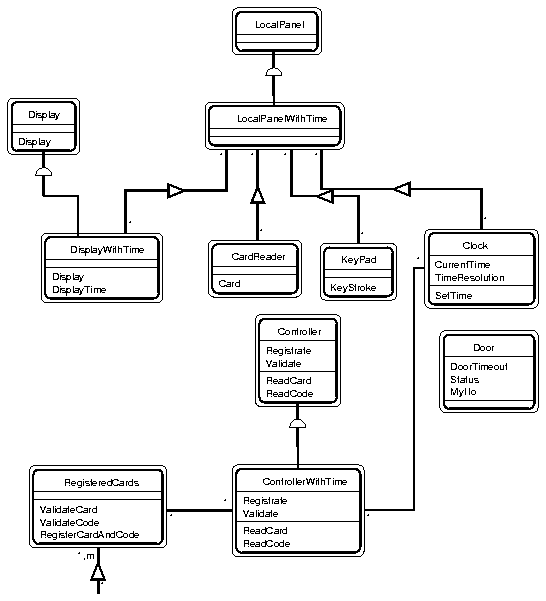
Here we have used inheritance because we have to change and add new properties in existing classes. For example, the class Display must be able to display time. The class Controller will also be changed, even if the name of the services and attributes will be the same (see Figure 153).
Figure\x11 153 : The OOA Analysis Diagram.
-----
(fig)

-----
-----------------------------------------------------------
AccessControl - OOA                 AccessControl -


                                    SDL-92
-----------------------------------------------------------
(System AccessControl)              System type
                                    BaseAccessControl
(Instance of system AccessControl)  System type
                                    TimeAccessControl


                                    (Specialization of the
                                    system type
                                    BaseAccessControl)
Class LocalPanel                    Virtual block type
                                    LocalPanel
Class LocalPanelWithTime            Redefined block type
                                    LocalPanel.
Class Display                       Virtual process type
                                    Display
Class DisplayWithTime               Redefined process type
                                    Display
Class Controller                    Virtual process type
                                    Controller
Class ControllerWithTime            Redefined process type
                                    Controller
Class Clock                         Process type Clock


                                    (instantiated in the
                                    redefined block type
                                    LocalPanel).
-----------------------------------------------------------
The AccessControl system will in version 1 contain:
- 3 block types,
- 7 process types and
- 4 procedures.
Most of the program logic is implemented in the process type Controller, process type RegisteredCard and in the operators for the ADT CardDbType (an array of CardType, where CardType holds the card and code data).
Some of the processes are quite trivial, so we will in this tutorial concentrate on the more complex blocks and process types. The rest of the diagrams will be provided.
The steps for designing version 1 will be:
- Open a provided system file for the system.
- Open an existing system diagram where parts of the interaction page is missing.
- Add a diagram type reference symbol for each of the block types and process type in the system.
- Instantiate the block types.
- Create a connection to a file for each of the provided types.
- Create the block type LocalPanel and design it.
- Create the process type RegisteredCard and design it.
- Write the SDL part of the ADT CardDbType (the C implementation of the literals and operators is provided).
- Analyze and correct the system.
- Generate a simulator and simulate the system using the provided X Windows user interface.
- Copy the tutorial directory and its subdirectories (contact if necessary your system manager) into a new directory.
- Also copy the X Window user interface application stored on the file with the name sdtenv to the tutorial directory. Make sure you copy the file from the subdirectory (e.g. SUNOS4bin/sdtenv for SUN OS 4) that corresponds to the computer system you are running.
- Go to directory VERSION1 and start the Organizer.
Before you continue, good advise is to specify the Source Directory for the system. Use the Organizer's Set Directories command from the File menu to specify the Source Directory to the current work directory (where you have created a work copy of the AccessControl diagrams), see page 71 in chapter 3, Tutorial: A First Example if you do not remember how to do this).
---------------------------------------------------------------------
Note:
The reason why you should specify the Source Directory is that the
examples that are provided with SDT have no directory path speci
fied in the system files (we want the example to be possible to use
on any file system). Since there are multiple versions of the
AccessControl system, each version with diagrams stored on files
with identical names (but in different directories), omitting to spec
ify the Source Directory may cause SDT to open the wrong version
of a file.
---------------------------------------------------------------------
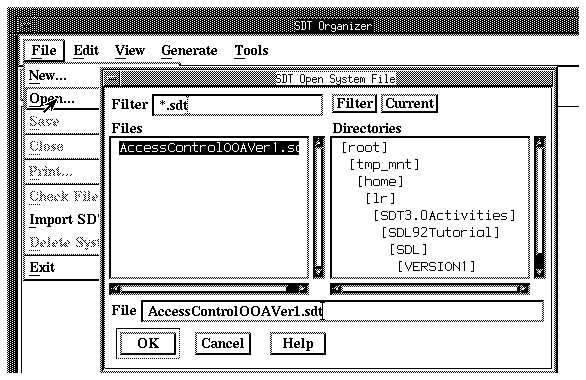
- Open the system file AccessControlOOAVer1.sdt with the Open command from the File menu, see Figure 154.
Figure\x11 154 : Opening an Existing System Diagram.
-----
(fig)

-----
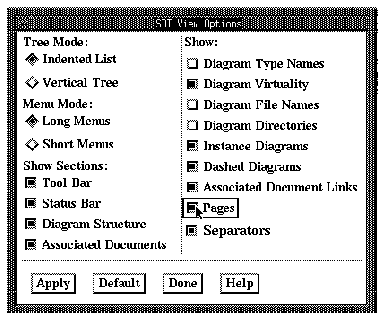
- Change the View Options for the Organizer, to display the pages. You will find the View Options command in the View menu, see Figure 155.
Figure\x11 155 : Setting the View Options.
-----
(fig)

-----
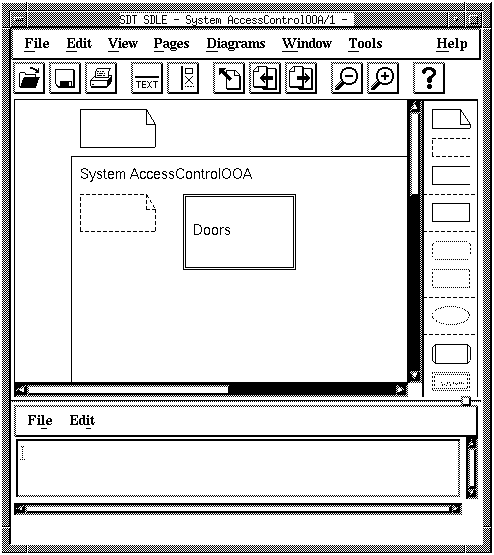
The system diagram and the individual pages should now be visible in the Organizer. As you can see there are separate pages for the signal definitions, data type definitions and synonym definitions. A separate interaction page is also created, but it is not complete, and it is your task to edit this page.
- Double-click on the symbol representing the interaction page (an interaction page can of course have any name, but it is convenient to give it a descriptive name like InteractionPage, to distinguish it from other pages containing definitions and declarations).
- When the editor is created and the InteractionPage is editable, place the first block type symbol and name it Doors, see Figure 156.
Figure\x11 156 : Adding a Block Type Symbol.
-----
(fig)

-----
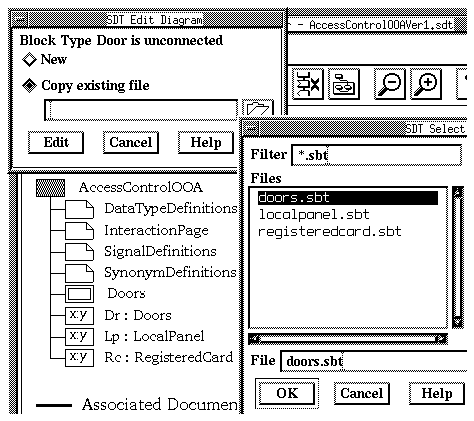
The file for the block type Doors is already present in the tutorial directory. Your next step is to connect the diagram type reference symbol to the existing file.
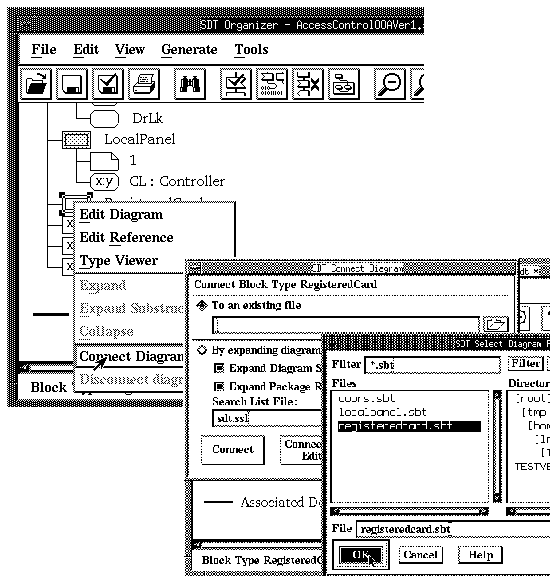
- Double-click on the reference symbol. In the dialog select Copy existing file and click on the folder symbol. In the following dialog, select the file doors.sbt, see Figure 157.
Figure\x11 157 : Selecting the File.
-----
(fig)

-----
- When the diagram is connected it will be brought up in the SDL Editor. To see the system diagram again, click on the interaction page (of the system diagram) in the Organizer, or use the Edit Reference Page in the Pages menu.
---------------------------------------------------------------------
Note:
If you use the Copy Existing File option, the Organizer will suggest
a new name (<old Name>1.xxx) when you save the diagram.
---------------------------------------------------------------------
You can also use the Connect command in the Organizer.
- To test this, place the next block type symbol and name it RegisteredCard.
- Then, select the block type symbol in the Organizer and press the right mouse button. In the pop-up menu that follows, choose the Connect Diagram command, see Figure 158.
Figure\x11 158 : Connecting to an Existing File From the Organizer.
-----
(fig)

-----
- Now place and connect the process types that are present in the tutorial directory (process type CardReader, Display, Door, Controller, KeyPad, DoorLock). The process type Controller will contain four procedures (DisplayAllocError, FlashMessage, ReadCode and RegisterCard). You must also connect these procedures to their corresponding files.
- Your InteractionPage should now look like Figure 159.
Figure\x11 159 : The Resulting Interaction Page.
-----
(fig)

-----
You should now create the new block type LocalPanel.
- Place a new block type symbol and name it LocalPanel.
- Double-click on it but this time choose the alternative New in the dialog. When you are prompted for the Page Name use the option Autonumbered.
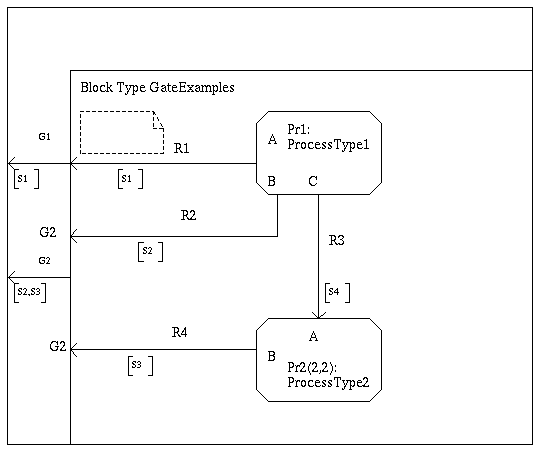
Before you start editing the block type LocalPanel you should have a look at a small block type example, see Figure 160.
Figure\x11 160 : An Example of a Block Type.
-----
(fig)

-----
At a quick glance this diagram may not look much different from an ordinary block diagram, but there are two differences you probably see right away: the frame of the diagram is different and the name field in the processes are different.
In a ordinary block diagram you have to specify how the block is connected to in- and outgoing channels through a set of connect clauses. Something similar has to be done for a block type, the concept is here called gate definitions. In a block type you do not know the name of in- and outgoing channels, so instead you specify gates and use them as connection point for the signal routes. When you specify the gates you must also specify which signals that are allowed to enter through this gate, this is referred to as specifying gate constraints.
In an instance of a block or process type the gates are used when connecting channels and signal routes in the instance symbol.
There are two gates in this example, G1 and G2. A signal route can be directly connected to a gate (R1 and G1) or just specify a connection gate (R2 and R4 are both connected to gate G2). You can also see how signal routes are connected to gates in the instance of the process types (Signal route R1 is connected to gate A etc.).
As you can see in the example the syntax for defining an instance of a process type is:
<process instance name>[<initial number,max number>]:
<Process Type name>.
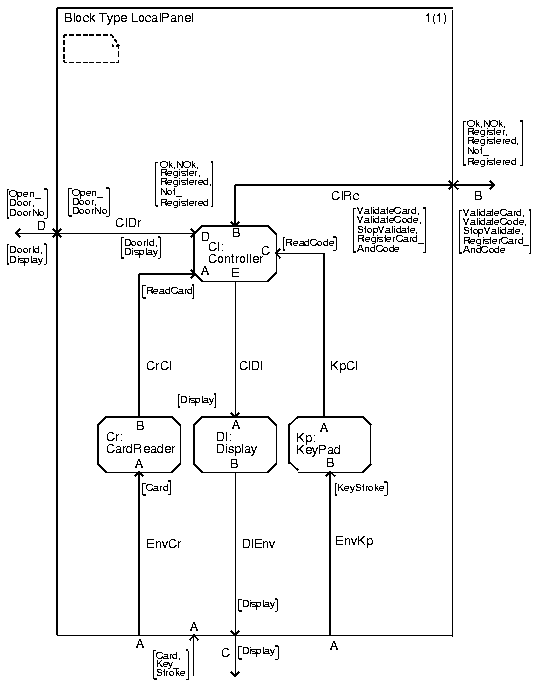
You should now be ready to design the block type LocalPanel according to Figure 161.
Figure\x11 161 : The Block Type LocalPanel.
-----
(fig)

-----
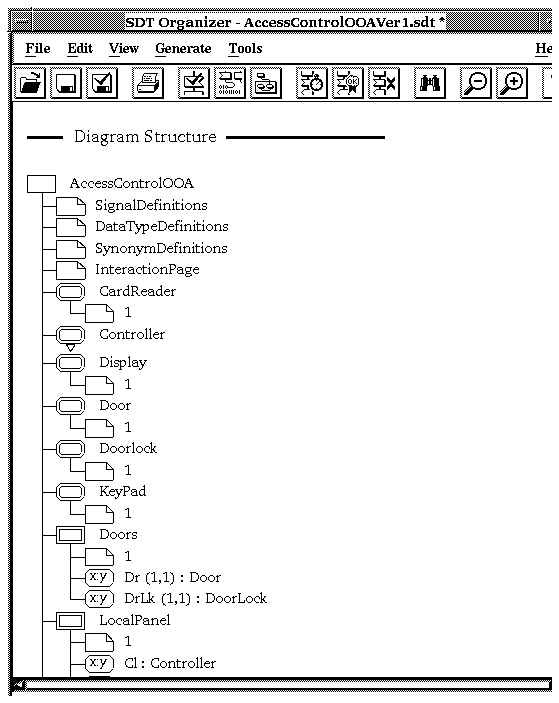
Before we continue, let's have a look at the Organizer view of the system now (see Figure 162)
Figure\x11 162 : An Organizer View on the System.
-----
(fig)

-----
- You can see that all the block and process types we have defined so far, are placed directly under the system diagram.
- You can also see how process instances are represented in the Organizer.
- You may also note that the page information is placed first in each diagram, before the information about referenced diagrams. This will have the effect that it is not possible to see, for example on which page in a process diagram a given procedure is defined.
A block or a process type can be defined both in a system diagram or in a block diagram, where to define it is more a question about the visibility you want. A type defined on the system level may be instantiated or used for specializations anywhere in the system.
Sometimes it can be useful to make the process type definition inside a block type, especially if the process and block should later on be used in specializations, you will see an example of this in Version 3 of the AccessControl system (see page 265).
There is one more diagram to create and that is the process type RegisteredCard.
This process will have three activities:
- To validate a card (check that a card is registered = the character-string read from the back of the card is registered).
- To validate a personal code (check that the given personal code is the same as the one registered for the card).
- To register a new card and personal code.
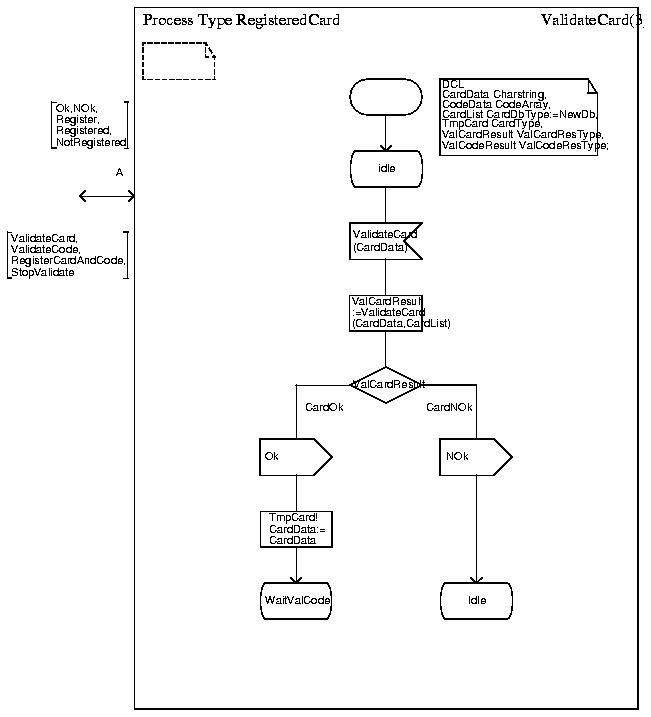
It is often good programming practise to describe different aspects of the behavior on different pages, in our case the three pages ValidateCard, ValidateCode and RegisterMode, see Figure 163 on page 239, Figure 165 on page 241 and Figure 166 on page 243.
Figure\x11 163 : The Process Type RegisteredCard, Page ValidateCard.
-----
(fig)

-----
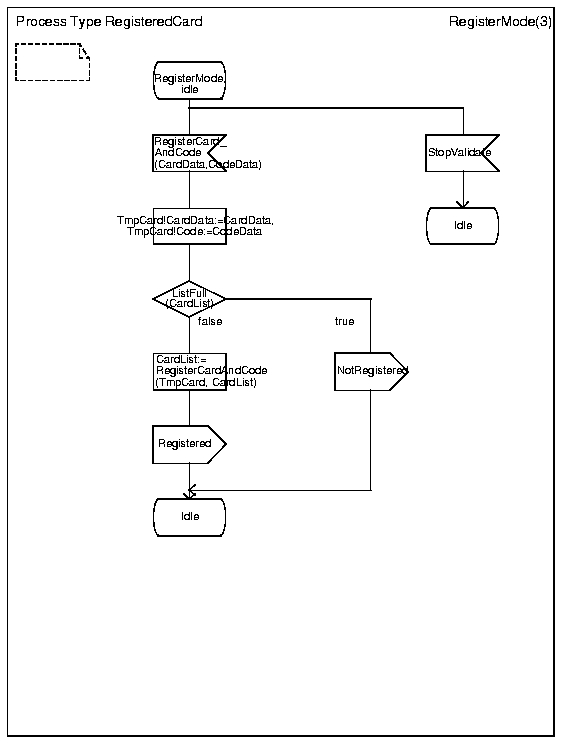
Figure\x11 164 : The Process Type RegisteredCard, Page RegisterMode.
-----
(fig)

-----
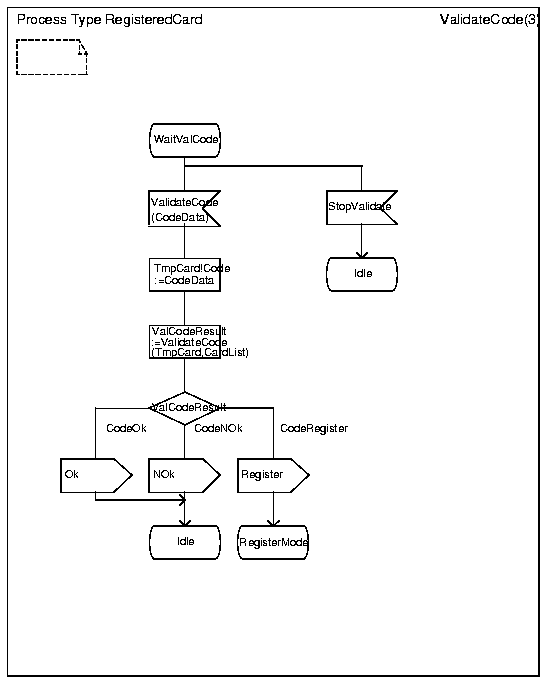
Figure\x11 165 : The Process Type RegisteredCard, Page ValidateCode.
-----
(fig)

-----
- Open the system diagram window (System AccessControlOOA, page InteractionPage).
- Place a process type symbol and name it RegisteredCard.
- Open the diagram and design the three pages according to Figure 163 on page 239, Figure 164 on page 240 and Figure 165 on page 241.
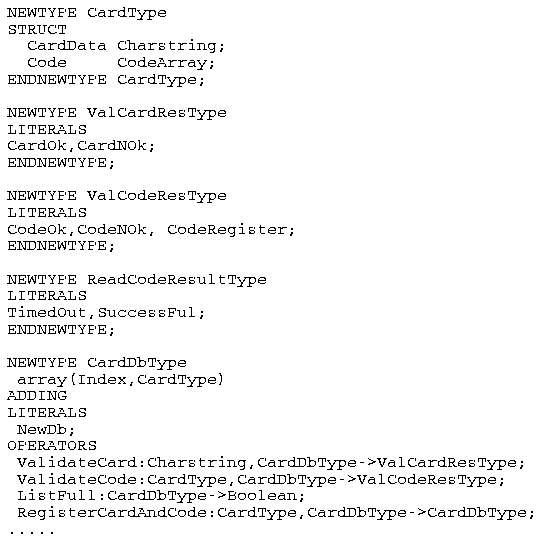
It is not always the case that an OOA class should be mapped to an SDL block or process type. For example, the classes Card and Code are better mapped to an ADT (Abstract Data Type) in SDL, because they represent data (the 40 character long charstring for the CardData and the 4 digits for the personal code).
If you open the page DataTypeDefinitions in the system diagram AccessControlOOA you will find a few SYNTYPE and NEWTYPE definitions.
Your task is now to create a data type that can hold the data of all registered cards and personal codes.
- You should first define a data type CardType as a STRUCT with the elements CardData and Code.
- Having this type available you can define a data type CardDbType as an array with elements of type CardType.
- The CardDbType will also have a number of operators defined; ValidateCard, ValidateCode, ListFull and RegisterCardAndCode and it is these operators that will do the "real" work of validating and registering cards and personal codes.
- Besides these datatypes we will also need two "enumerated types" to represent the result of validating card and validating code: ValCardResType and ValCodeResType. Figure 166 on page 243 describes how you should define these datatypes in SDL.
Figure\x11 166 : The Data Type Definitions.
-----
(fig)

-----
- You will also find on page DataTypeDefinitions, a piece of text that start with the line:
/*#ADT(B).....
This is the in-line C implementation of the literals/Operators: NewDb, ValidateCard, ValidateCode, ListFull and RegisterCardAndCode. You should take this code and place in the newtype CardDbType definition according to the following example:
Example 2
NEWTYPE Example
LITERALS ....
OPER              ATORS
MyOp1:........->......;

/*#ADT(B)
.....
....
*/
      ENDNEWTYPE;
You are now ready with the design of the AccessControl system, first version.
The next step is to analyze the system.
Before you start analyzing your own system it may be a good idea to analyze a prepared example. It is still the AccessControl system but it will contain some errors introduced on purpose, like inconsistent gate and signal route definitions, incorrect VIA declarations etc.
- Exit SDT and change to the directory:
<your tutorial directory>/VERSION1/VERS1WITHERRORS/
- Start SDT again and open the system file
AccessControlOOACompleteVer1WithErrors.sdt
- Remember to specify the Source Directory to the directory VERS1ERR
- Save the system file, close the system and open it again.
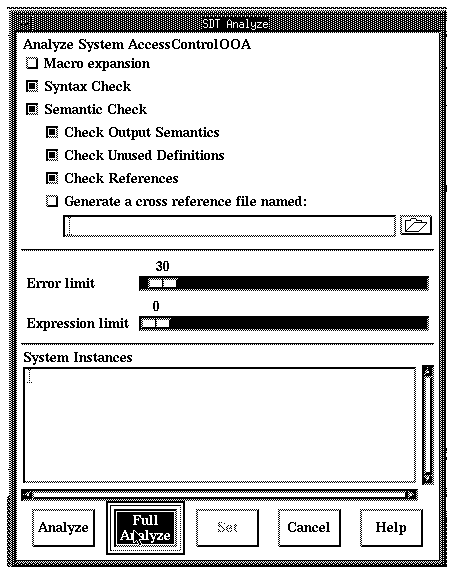
- Start the Analyzer and set the Analyzer Options according to Figure 167. Click the Full Analyze button.
Figure\x11 167 : Analyzer Options.
-----
(fig)

-----
- First you will find some simple syntactical errors, that have to do with a syntactic error in an assignment and a decision where a case is not named.
- Correct these errors and analyze again.
- You will now find altogether 10 semantic errors, 9 of them are refering to gate C of process instance Lp (Instantiation of process type LocalPanel) and 1 is refering to gate B of the same process instance. In the process type diagram LocalPanel, check and correct the correct name of the gates.
- The system should now be correct (some warnings may still be reported) and you can continue with analyzing your own version.
Now open your own version of the AccessControl system (system file AccessControlOOAVer1.sdt). Analyze and correct any fault that may occur.
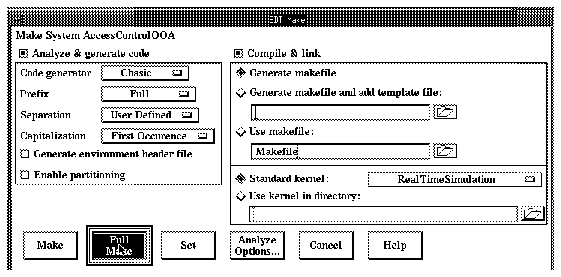
- Create a real-time simulator for the AccessControl system. Adjust the Generate Options (the Make command Generate menu) according to Figure 168.
Figure\x11 168 . Analyze and Make Options.
-----
(fig)

-----
- Start the SDT Simulator UI and set the trace to 0.
- Start the communication with the environment with the command: Start-Sdt-Env and then the X Windows user interface with the command: Start-UI. Finally after the user interface has started type the command: Go-Forever to start the simulation.
The user-interface consists of a card reader, two cards labeled: American Express and VISA, a display window, 8 lamps indicating opened or closed doors and a KeyPad (see Figure 169).
Figure\x11 169 : The GUI.
-----
(fig)

-----
To enter a card, click on one of the two available cards, the card will then pop into the card reader slot.
To remove a card from the card reader click inside the card reader slot.
When you are prompted to input code, use the keypad and enter your code by clicking on the keys.
To open a door, press the door number on the keypad. (Note: clicking the door lamp 1-8 does not open the door.)
You should now run a number of test cases to verify that the implementation is according to the specification.
Table of Contents  Next Chapter
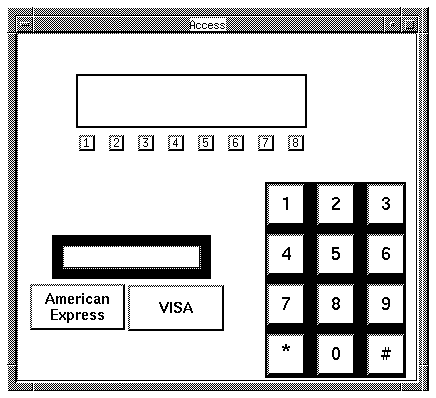